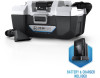
Hoover ONEPWR Wet/Dry Cordless Utility Vacuum Product Manual - Page 7
Operation
 |
View all Hoover ONEPWR Wet/Dry Cordless Utility Vacuum manuals
Add to My Manuals
Save this manual to your list of manuals |
Page 7 highlights
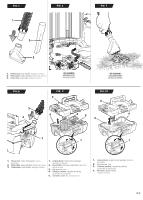
OPERATION WARNING! To reduce the risk of fire or explosion, do not leave the product running while unattended. Immediately stop the unit if it shows signs of abnormal operation such as loss of suction, liquid or debris in the exhaust, or any abnormal motor noises. Installing/Removing Attachements See Figure 5, page 10 • Vacuuming can be performed with only the flexible hose or the hose with vacuum attachments. • Turn off the wet/dry vac. • Insert the attachment onto the tapered end of the flexible hose, making sure the attachment is firmly in place. • To remove, hold the attachment and pull from hose. Dry Vacuuming See Figure 6, page 10 WARNING! In low relative humidity conditions, vacuuming fine debris with the wet/dry vac can cause a static charge resulting in static shock. To reduce static shock while using, add moisture to the air with a humidifier. Vacuum only items small enough to fit through the hose or the attachment. When vacuuming, make sure that the dry use filter stays in place. The performance of the wet/dry vac will decrease with a full collection container. When emptying the collection container, check to see if the dry use filter needs replacing. Note: The wet/dry vac is shipped ready for dry use vacuuming. To equip the wet/dry vac for wet use, remove the dry use filter. clockwise to unlock and pull the filter free of the filter housing. • Replace lid and lock securely. Using the Wet/Dry Vac as a Blower See Figure 8, page 10 At all times, the wet/dry vac blows air through the blower port as part of the exhaust system. However, you can use the wet/dry vac as a blower by attaching the utility nozzle to the blower port. • Turn off the wet/dry vac and remove the battery pack. • Remove the hose from the tank. • Remove the utility nozzle from the hose if attached. • Push larger end of the utility nozzle into the opening of the exhaust port. Attach the flexible hose to the tapered end of the utility nozzle to use as a blower. • To remove the utility nozzle, pull the nozzle from the opening in the exhaust port. To keep from scattering debris, blow around the outer edges of a debris pile. Never blow directly into the center of a pile. Use rakes and brooms to loosen debris before blowing. In dusty conditions, slightly dampen surfaces when water is available. Watch out for children, pets, open windows, or freshly washed cars, and blow debris safely away. After using blowers or other equipment, clean up. Dispose of debris properly. Wet Vacuuming See Figure 7, page 10 WARNING! When vacuuming liquid, make sure the product does not get submerged or doused in liquid, which could cause shock, vacuum failure, or personal injury. When wet vacuuming, be aware that the wet/dry vac is equipped with a water float inside the filter unit housing. This water float is designed to shut Off the suction when the collection container reaches full wet capacity. When the collection container is full, turn the wet/dry vac Off and empty the collection container as shown in Maintenance. • Unlock the locking latches and remove the lid. • Remove the dry use filter by rotating the filter counter- PG.6
-
 1
1 -
 2
2 -
 3
3 -
 4
4 -
 5
5 -
 6
6 -
 7
7 -
 8
8 -
 9
9 -
 10
10 -
 11
11 -
 12
12 -
13
-
14
-
15
-
16
-
17
-
18
-
19
-
20
-
21
-
22
-
23
-
24
-
25
-
26
-
27
-
28
-
29
-
30
 |
 |
