Hoover ONEPWR Wet/Dry Cordless Utility Vacuum Product Manual - Page 8
Maintenance
 |
View all Hoover ONEPWR Wet/Dry Cordless Utility Vacuum manuals
Add to My Manuals
Save this manual to your list of manuals |
Page 8 highlights
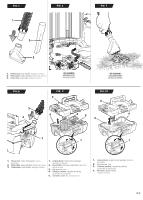
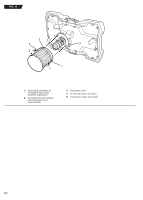
MAINTENANCE General Maintenance Avoid using solvents when cleaning plastic parts. Most plastics are susceptible to damage from various types of commercial solvents and can be damaged by their use. Use clean cloths to remove dirt, dust, oil, grease, etc. This product contains no serviceable parts. If appliance is not working as it should, has been dropped, damaged, left outdoors or dropped in water, contact customer service at 800-406-2005. WARNING! Do not at any time let brake fluids, gasoline, petroleumbased products, penetrating oils, etc., come in contact with plastic parts. Chemicals can damage, weaken or destroy plastic which could result in serious personal injury. Removing Waste from the Collection Container The collection container should be checked, emptied, and cleaned periodically to obtain maximum efficiency. Dry Waste See Figure 9, page 10 • Remove the battery pack. • Unlock the locking latches and remove the lid. • Remove the dry use filter. • Inspect filter, lightly shake any dust or dirt from the filter, or replace as necessary. • Empty the collection container; wash out if necessary. • Reinstall dry use filter. • Before replacing the lid, make sure all pieces are completely dry. • Replace lid and lock securely. Liquid Waste See Figure 10, page 10 • Remove the battery pack. • Unlock the locking latches and remove the lid. • Empty the collection container; wash out if necessary. • Before replacing the lid, make sure all pieces are com- pletely dry. • Replace lid and lock securely. WARNING! Do not allow liquid pick up to remain in the collection container for extended periods of time. Moisture can develop in the motor compartment and shorten the life of the motor. WARNING! Do not turn unit upside down, as liquid may enter the motor unit. Cleaning/Replacing the Dry Use Filter See Figure 11, page 11 • Remove the battery pack. • Unlock the two locking latches and remove the lid. To Clean/Replace: • Remove the dry use filter by rotating the filter counterclockwise to unlock and pull the filter free of the filter housing. • Lightly shake any dust or dirt off the filter or replace as needed. • Reinstall the filter by aligning the raised locking tab on the filter with the slot on the filter housing onthe underside of the lid. Rotate the filter clockwise to lock into place. NOTE: Make sure the filter is seated properly for dry vacuuming. Remove the filter for wet vacuuming. Storage • Clean all foreign material from the wet/dry vac. • Clean the outside of the collection container with warm water and mild soap. • Empty and clean the collection container, flexible hose, nozzles, and attachments with warm water and mild soap and allow to completely dry before storage. • Store flexible hose and attachments inside the collection container or on the lid. • The collection container should be disinfected as needed and before prolonged storage. • Store indoors in a place that is inaccessible to children. Keep away from corrosive agents such as garden chemicals and de-icing salts. PG.7
-
 1
1 -
2
-
 3
3 -
 4
4 -
 5
5 -
 6
6 -
 7
7 -
 8
8 -
 9
9 -
 10
10 -
 11
11 -
 12
12 -
 13
13 -
14
-
15
-
16
-
17
-
18
-
19
-
20
-
21
-
22
-
23
-
24
-
25
-
26
-
27
-
28
-
29
-
30
 |
 |