Hoover SH40100 Product Manual - Page 6
HOW TO USE - bags
 |
View all Hoover SH40100 manuals
Add to My Manuals
Save this manual to your list of manuals |
Page 6 highlights
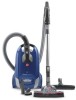
2. HOW TO USE CLEANER Description 1. Hand Grip 2. Power Nozzle On/Off Switch 3. Extension Wand Release Buttons 4. Extension Wand 5. Dusting Brush 6. Wand Tool Holder 7. Power Nozzle Release Button 8. Power Nozzle 9. Carrying Handle 10. Hose Connector 11. Filter Bag Door 12. Sytem Check Indicator 13. Suction Power Control 14. On/Off Pedal 15. Cord Rewind Pedal: Step on pedal to rewind cord for storage. Hold plug until cord is rewound. 16. Large Wheels: Provide easy towing when cleaner is pulled over carpet, area rugs and door sills 17. Crevice Tool 18. Final Filter Door 19. Power Cord 20. Wand Holder Slot 21. Power Nozzle Indicator LED 2.1 10 11 5 6 17 12 The assembled cleaner will look like 9 the drawing. 14 16 1 2 3 4 7 21 8 13 15 20 19 18 Actual model may vary from images shown. 6
-
 1
1 -
 2
2 -
 3
3 -
 4
4 -
 5
5 -
 6
6 -
 7
7 -
 8
8 -
 9
9 -
 10
10 -
 11
11 -
 12
12 -
13
-
14
-
15
-
16
-
17
-
18
-
19
-
20
-
21
-
22
-
23
-
24
-
25
-
26
-
27
-
28
-
29
-
30
-
31
-
32
-
33
-
34
-
35
-
36
-
37
-
38
-
39
 |
 |
