Hoover UH70832 Product Manual - Page 18
Warning, Notice
 |
View all Hoover UH70832 manuals
Add to My Manuals
Save this manual to your list of manuals |
Page 18 highlights
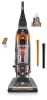
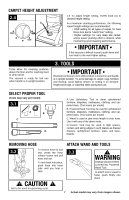
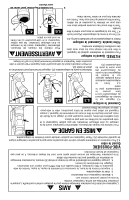
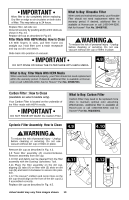
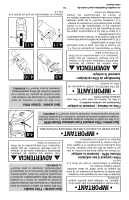
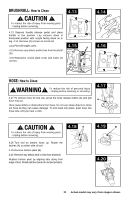
! NOTICE ! A Thermal Protector has been designed into your cleaner to protect it from overheating. When the thermal protector activates the cleaner will stop running. If this happens proceed as follows: 1. Turn cleaner OFF and unplug it from the electrical outlet. 2. Empty dirt cup. 3. Inspect the nozzle inlet, hose connector, hose, dirt cup inlet, cyclonic filter, Rinsable filter, and HEPA filter for any obstructions. Clear obstructions if present. 4. When cleaner is unplugged and motor has cooled for 30 minutes, the thermal protector will deactivate and cleaning may continue. If the thermal protector continues to activate after following the above steps, your cleaner needs servicing. DIRT CUP When to Empty 4.2 To maintain optimal performance, empty the dirt cup before the dirt cup reaches the max line, as indicated by arrow. Place the vacuum in the upright position before removing the dirt cup. 4.2 ! WARNING ! To reduce the risk of personal injury - Unplug before cleaning or servicing. Do not use vacuum without dirt cup or filters in place. Very fine materials, such as face powder or cornstarch, may seal the filter and cause a reduction in performance. When using the vacuum for this type of dust, empty the cup and clean the filters often. How to Empty 4.3 Press dirt cup release button (A) and pivot cup out. 4.3 A 4.4 4.5 A 4.4 Hold dirt cup over trash receptacle, push dirt cup door release lever (B) to open dirt cup door (C). B C Close dirt cup door (C). Press firmly to secure at front. 4.5 Place bottom of dirt cup into vacuum body first. Pivot dirt cup into vacuum body and press firmly until it locks into place. FILTERS: When to Clean To maintain optimal performance, filters should be cleaned at least every two months under normal use. Rinsable Filter: How to Clean Remove dirt cup as described in Fig. 4.3. 4.6 Pull up on dirt cup latch (A) to open. 4.7 Pull on the fabric tab on filter to remove Rinsable Filter. Hold filter under running water for two minutes to remove dirt and debris. Squeeze filter twice while underwater. Remove from water and squeeze a final time to remove excess water. ! WARNING ! To reduce the risk of personal injury - Unplug before cleaning or servicing. Do not use vacuum without dirt cup or filters in place. 4.6 4.7 A B 9 Actual model may vary from images shown.
-
 1
1 -
2
-
3
-
4
-
5
-
6
-
7
-
8
-
9
-
10
-
11
-
12
-
 13
13 -
 14
14 -
 15
15 -
 16
16 -
 17
17 -
 18
18 -
 19
19 -
 20
20 -
 21
21 -
 22
22 -
 23
23 -
24
-
25
-
26
-
27
-
28
-
29
-
30
-
31
-
32
-
33
-
34
-
35
-
36
-
37
-
38
-
39
-
40
-
41
-
42
-
43
-
44
-
45
-
46
-
47
-
48
 |
 |
