Hotpoint HDA3500NWW Installation Instructions - Page 10
Step 11, Slide Dishwasher Into Cabinet, Step 12, Position And Level, Dishwasher
 |
UPC - 084691156185
View all Hotpoint HDA3500NWW manuals
Add to My Manuals
Save this manual to your list of manuals |
Page 10 highlights
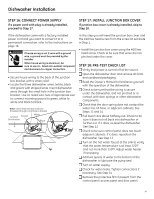
Dishwasher Installation STEP 11: SLIDE DISHWASHER INTO CABINET IMPORTANT - Do not push against the front panel with knees. Damage will occur. • Grasp the sides of the front panel and slide the dishwasher into the opening a few inches at a time. Pull the drain hose and power cord, if equipped, through the holes in the adjacent cabinet while sliding the dishwasher into position. STEP 12: POSITION AND LEVEL DISHWASHER IMPORTANT - Dishwasher must be level for proper dish rack operation, wash performance, and door operation. The dishwasher must be leveled left to right and front to back. This assures that the dish racks will not roll in or out on their own, circulation water will flow to the pump inlet, and the door will close without hitting the side of the tub. • Remove the lower dish rack and place a level on the door and lower rack track as shown in Figure R. Figure Q Do not push against front door panel with knee. Damage to the door panel will occur. 3/4" Check Level Front-to-Back • Check the tub insulation blanket, if equipped, to be sure it is smoothly w05raAp-p1e1d8a3rTound the tub. It should not be "bunched up" and it must not interfere with the door springs. If the insulation is "bunched up" or interfering with the springs, straighten and re-center the blanket prior to sliding the dishwasher into its final position. • Make sure the drain hose is not kinked under or behind the dishwasher. • Make certain the house wiring, drain line, and water line do not interfere with components under the dishwasher. • The dishwasher tub flange should be approximately 3/4" behind the face of the adjacent cabinet. Refer to Figure R. Tip: Avoid unnecessary service charges for panel damage. Do not press on the center of panel with hands or knees when sliding dishwasher into position. 10 Figure R Check Level Side-to-Side • Adjust the level of the dishwasher by individually tduisrhnwinags0thh6eerFfao-su1ril8llues4gtsr7aoDtnedathine bottom of Figure S. the Turn Legs to Adjust Figure S • The dishwasher is properly leveled when the level indicator is centered left to right and front to back. Tthheesdidiseh9sw2oaf3sth-he1ert0duoVbo. r should close without hitting • Replace the lower rack. Tip: Avoid unnecessary service charges for poor wash performance and rack operation. Pull the dish racks half way out. They should remain stationary. Open and close the door. The door should fit in the tub opening without hitting the side of the tub. If the racks roll on their own, or the door hits the side of the tub, re-level the dishwasher.
-
 1
1 -
2
-
3
-
4
-
 5
5 -
 6
6 -
 7
7 -
 8
8 -
 9
9 -
 10
10 -
 11
11 -
 12
12 -
 13
13 -
 14
14 -
 15
15 -
16
 |
 |
