Hotpoint HDA3500NWW Installation Instructions - Page 14
Step 19, Dishwasher Wet Test, Check List - hot point
 |
UPC - 084691156185
View all Hotpoint HDA3500NWW manuals
Add to My Manuals
Save this manual to your list of manuals |
Page 14 highlights
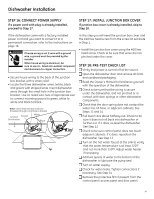
Dishwasher Installation STEP 19: DISHWASHER WET TEST CHECK LIST ■ Turn on power supply or if power cord is used, plug it into the wall outlet. ■ Latch dishwasher door. ■ For electronic dishwashers, select the normal cycle and press the start pad one time. Cycles POTS & PANS HEAVY WASH NORMAL CHINA WASH CRYSTAL RINSE ONLY HI TEMP HI TEMP HEATED RINSE WASH DRY LOCK (2 TIMES) 248 DELAY HOURS CLEAN CLEAN START RESET - Check the electrical connection to the water valve. The red electrical connector should be plugged into the dishwasher water valve. If it is not plugged in, turn off electrical power to the dishwasher. Plug the red connector into the dishwasher water valve and then restore power. Red Connector ■ For dial models, press the normal and hot start pads, if model has them, and then turn control dial just enough to start dishwasher. Be careful not to turn the dial past the first water fill. Dial should point to "Hot Start Option" or "Hot Prewash Option" depending on model. Cycles Pots Heavy Normal Hot Hi-Temp Heated Reset & Pans Wash Wash Start Wash Dry Cycle on Hot Start Option Start Start Delay (HRS) 2 1 6 543 Off Plate Warmer (Heated Dry On) Rinse Only (Heated Dry Off) Light Wash Appearance varies by model. Not all models have pushbuttons. ■ Check to be sure that water enters the dishwasher. This could take up to 4 minutes. If water does not enter the dishwasher - Check to be sure that the water is turned on - Lightly tap the flood float cover to dislodge a stuck flood float. Flood Float Cover ■ Check for leaks under the dishwasher. If a leak is found, turn off power, tighten connections and restore power. ■ Check for leaks around the door. A leak around the door could be caused by the dishwasher door rubbing or hitting adjacent cabinets. Reposition the dishwasher if necessary. See Steps 11, 12 and 13. ■ Most dishwasher models will drain about 3 minutes after the first fill. Check the drain line for leaks when dishwasher drains. If leaks are found, turn off power, correct as necessary and then restore power. ■ Open the dishwasher door and make sure most of the water has drained. If the water does not drain, check to be sure disposer plug has been removed and/or air gap is free of debris. ■ Let the dishwasher run through another fill and drain cycle. Check again to be sure there are no leaks. ■ At the end of the second drain, push the reset pad on electronic models. For dial models, unlatch the door and rotate the dial to the "OFF" position. 14
-
 1
1 -
2
-
3
-
4
-
5
-
6
-
7
-
8
-
 9
9 -
 10
10 -
 11
11 -
 12
12 -
 13
13 -
 14
14 -
 15
15 -
 16
16
 |
 |
