Hotpoint RGB508PEHWH Installation Instructions - Page 37
burner lights, rotate knob out of the, sound indicating proper
 |
UPC - 084691085188
View all Hotpoint RGB508PEHWH manuals
Add to My Manuals
Save this manual to your list of manuals |
Page 37 highlights
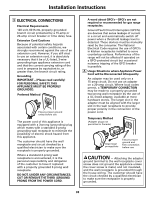
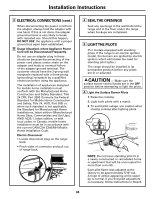
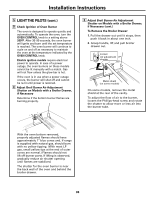
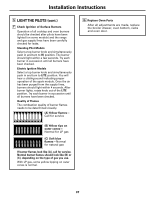
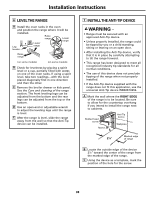
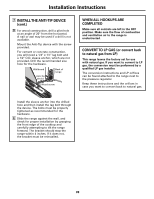
Installation Instructions 5 LIGHT THE PILOTS (cont.) F Check Ignition of Surface Burners Operation of all cooktop and oven burners should be checked after pilots have been lighted (on some models) and the range and gas supply lines have been carefully checked for leaks. Standing Pilot Models Select a top burner knob and simultaneously push in and turn to HI position. The burner should light within a few seconds. Try each burner in succession until all burners have been checked. Electric Ignition Models Select a top burner knob and simultaneously push in and turn to LITE position. You will hear a clicking sound indicating proper operation of the spark module. Once the air has been purged from the supply lines, burners should light within 4 seconds. After burner lights, rotate knob out of the LITE position. Try each burner in succession until all burners have been checked. Quality of Flames The combustion quality of burner flames needs to be determined visually. (A) Yellow flames- Call for service (B) Yellow tips on outer cones- Normal for LP gas (C) Soft blue flames-Normal for natural gas If burner flames look like (A), call for service. Normal burner flames should look like (B) or (C), depending on the type of gas you use. With LP gas, some yellow tipping on outer cones is normal. G Replace Oven Parts After all adjustments are made, replace the broiler drawer, oven bottom, racks and oven door. 37
-
 1
1 -
2
-
3
-
4
-
5
-
6
-
7
-
8
-
9
-
10
-
11
-
12
-
13
-
14
-
15
-
16
-
17
-
18
-
19
-
20
-
21
-
22
-
23
-
24
-
25
-
26
-
27
-
28
-
29
-
30
-
31
-
 32
32 -
 33
33 -
 34
34 -
 35
35 -
 36
36 -
 37
37 -
 38
38 -
 39
39 -
 40
40 -
 41
41 -
 42
42 -
43
-
44
-
45
-
46
-
47
-
48
 |
 |