Hunter 23980 Owner's Manual - Page 8
Partially install a canopy screw into the side opposite the ceiling
 |
View all Hunter 23980 manuals
Add to My Manuals
Save this manual to your list of manuals |
Page 8 highlights
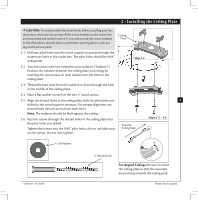
5 • Installing the Canopy Step 5-1 Tab Groove Step 5-2 5-1. Rotate the hanger ball so the tab in the canopy is secure in the groove in the hanger ball. WARNING: Failure to complete this step could cause fan to fall. 5-2. Lift the fan and align the canopy screw holes with the mounting holes on the ceiling plate. 5-3. Partially install a canopy screw into the side opposite the ceiling plate tabs. 5-4. Partially install another canopy screw into the hole between the two ceiling plate tabs. Securely tighten both screws. 8 Step 5-3 Step 5-4 Hunter Fan Company 42405-01 • 01/20/06
-
 1
1 -
2
-
 3
3 -
 4
4 -
 5
5 -
 6
6 -
 7
7 -
 8
8 -
 9
9 -
 10
10 -
 11
11 -
 12
12
 |
 |

8
Hunter Fan Company
42405-01 • 01/20/06
5 • Installing the Canopy
5-1. Rotate the hanger ball so the tab in the canopy is secure in the
groove in the hanger ball.
WARNING:
Failure to complete this step could cause fan to fall.
5-2. Lift the fan and align the canopy screw holes with the mounting
holes on the ceiling plate.
5-3. Partially install a canopy screw into the side opposite the ceiling
plate tabs.
5-4. Partially install another canopy screw into the hole between the
two ceiling plate tabs. Securely tighten both screws.
Step 5-1
Step 5-2
Groove
Tab
Step 5-3
Step 5-4