Hunter 30547 Owner's Manual - Page 20
Air Purifier Maintenance - prefilter
 |
View all Hunter 30547 manuals
Add to My Manuals
Save this manual to your list of manuals |
Page 20 highlights
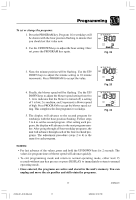
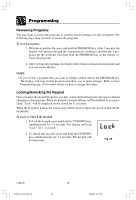
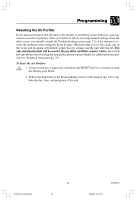
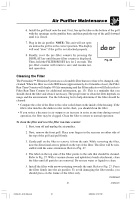
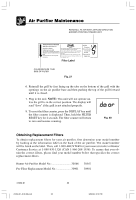
Air Purifier Maintenance Cleaning Your Air Purifier Proper maintenance of your Hunter Air Purifier will help ensure years of trouble free service. Follow these steps to properly maintain your air purifier: 1. Approximately every 90 days, the outside of the unit should be cleaned with a soft, damp cloth. 2. If needed, the front grill can be removed from the unit and cleaned with soapy water. Simply remove the pre-filter before exposing the grill to water. 3. Follow the instructions in Changing the Pre-Filter and Cleaning the Filter (pgs. 20 and 21) to determine when and how to replace the filters. NOTES: • The air purifier must be unplugged during the cleaning process. • Be sure the unit is completely dry before plugging in and using. • Never immerse unit in water. Changing the Pre-Filter When the Pre-Filter Counter exceeds 1400 hours (refer to Filter Run-time Counters for additional information pg. 13), the display will automatically switch to the Pre-Filter Display and the Pre-Filter indicator will flash as a reminder that you should replace the prefilter. To maintain proper odor-removing capability and overall filtration performance, the pre-filter should be changed every 1400 hours (approximately 3 months of use). If necessary, the pre-filter can be changed more often. Proper maintenance of the pre-filter will help extend the life of the cleanable filter. Refer to Obtaining Replacement Filters (pg. 22) if you need help finding replacement filters. To change the pre-filter and reset the pre-filter counter: 1. First, turn off and unplug the air purifier. 2. Next, remove the front grill. Place your fingers under the handle of the front grill and pull towards you and up. 3. The pre-filter is attached to the inside of the grill with hook tape. Pull gently on the pre-filter to removed it. 4. If needed, use a soft damp cloth to wipe off the grill. 5. Install the new pre-filter by placing it in the grill and pressing gently on the prefilter so that it adheres to the hook tape. You may notice a few black particles coming off the pre-filter. Those particles are part of the odor-removing activated carbon and will be collected on the filter during regular use. 41959-01 20 41959-01_3.30.06.pmd 20 3/30/06, 3:15 PM
-
 1
1 -
2
-
3
-
4
-
5
-
6
-
7
-
8
-
9
-
10
-
11
-
12
-
13
-
14
-
 15
15 -
 16
16 -
 17
17 -
 18
18 -
 19
19 -
 20
20 -
 21
21 -
 22
22 -
 23
23 -
 24
24 -
 25
25 -
26
 |
 |