Hunter 82022 Owner's Manual - Page 11
Existing Fan
 |
View all Hunter 82022 manuals
Add to My Manuals
Save this manual to your list of manuals |
Page 11 highlights
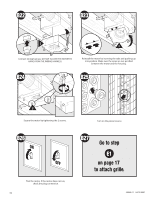
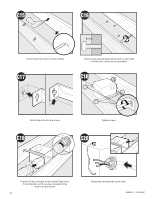
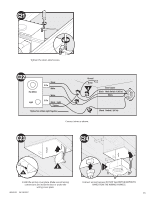
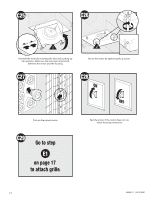
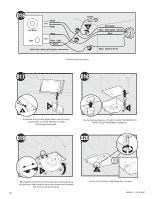
Existing Construction - accessible from above C11 EXISTING FAN NO EXISTING FAN OR Remove an existing fan and check to make sure the opening is large enough to accommodate the new motor housing (8"x 8 1/2"). Use the motor housing as a template to mark position. 8" 8 1/2" C12 F E Cut out an opening for the housing. C13 Slide the mounting rails into brackets. C14 5/8 5/8 1/2 1/2 Position the correct depth mark at the bottom edge of the joist based on the thickness of your sheetrock. 42949-01 04/18/2007 Mark position of screws by using holes as a template. 11
-
 1
1 -
2
-
3
-
4
-
5
-
 6
6 -
 7
7 -
 8
8 -
 9
9 -
 10
10 -
 11
11 -
 12
12 -
 13
13 -
 14
14 -
 15
15 -
 16
16 -
17
-
18
-
19
-
20
-
21
-
22
-
23
-
24
-
25
-
26
-
27
-
28
-
29
-
30
-
31
-
32
-
33
-
34
-
35
-
36
-
37
-
38
-
39
-
40
-
41
-
42
-
43
-
44
-
45
-
46
-
47
-
48
-
49
-
50
-
51
-
52
-
53
-
54
-
55
-
56
-
57
-
58
-
59
-
60
 |
 |

EXISTING FAN
C11
C12
E
F
Existing Construction – accessible from above
11
NO EXISTING FAN
8”
8 1/2”
OR
Remove an existing fan and check to make sure the
opening is large enough to accommodate the new
motor housing (8”x 8 1/2”).
Cut out an opening for the housing.
Use the motor housing as a template to mark position.
Slide the mounting rails into brackets.
Position the correct depth mark at the bottom edge of the
joist based on the thickness of your sheetrock.
5/8
1/2
5/8
1/2
C13
C14
Mark position of screws by using holes as a template.
42949-01
04/18/2007