IBM 8677 Hardware Maintenance Manual - Page 47
Installing a module, label attached.
 |
UPC - 000435842312
View all IBM 8677 manuals
Add to My Manuals
Save this manual to your list of manuals |
Page 47 highlights
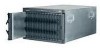
Installing a module The following illustration shows how to install a power module, management module, or I/O module in the rear of the BladeCenter unit. See "Replacing a blower module" on page 47 for information about replacing a blower module. Before you begin, read the documentation that comes with your option. Statement 8: CAUTION: Never remove the cover on a power supply or any part that has the following label attached. Hazardous voltage, current, and energy levels are present inside any component that has this label attached. There are no serviceable parts inside these components. If you suspect a problem with one of these parts, contact a service technician. Complete the following steps to install a module: Note: These instructions assume the BladeCenter unit is connected to power. 1. Read the safety information beginning on page 85 and "Installation guidelines" on page 31 through "Handling static-sensitive devices" on page 32. 2. Remove the acoustic module option, if installed, from the rear of the BladeCenter unit. See "Installing and removing the acoustic module option" on page 40 for instructions. 3. Remove the filler module from the bay. 4. Ensure that the release lever on the module is in the open position (perpendicular to the module). 5. Slide the module into the appropriate module bay until it stops. 6. Push the release lever on the front of the module closed. Chapter 4. Installing options 37
-
 1
1 -
2
-
3
-
4
-
5
-
6
-
7
-
8
-
9
-
10
-
11
-
12
-
13
-
14
-
15
-
16
-
17
-
18
-
19
-
20
-
21
-
22
-
23
-
24
-
25
-
26
-
27
-
28
-
29
-
30
-
31
-
32
-
33
-
34
-
35
-
36
-
37
-
38
-
39
-
40
-
41
-
 42
42 -
 43
43 -
 44
44 -
 45
45 -
 46
46 -
 47
47 -
 48
48 -
 49
49 -
 50
50 -
 51
51 -
 52
52 -
53
-
54
-
55
-
56
-
57
-
58
-
59
-
60
-
61
-
62
-
63
-
64
-
65
-
66
-
67
-
68
-
69
-
70
-
71
-
72
-
73
-
74
-
75
-
76
-
77
-
78
-
79
-
80
-
81
-
82
-
83
-
84
-
85
-
86
-
87
-
88
-
89
-
90
-
91
-
92
-
93
-
94
-
95
-
96
-
97
-
98
-
99
-
100
-
101
-
102
-
103
-
104
-
105
-
106
-
107
-
108
-
109
-
110
-
111
-
112
-
113
-
114
-
115
-
116
-
117
-
118
-
119
-
120
-
121
-
122
-
123
-
124
-
125
-
126
-
127
-
128
-
129
-
130
-
131
-
132
-
133
-
134
-
135
-
136
-
137
-
138
-
139
-
140
-
141
-
142
-
143
-
144
-
145
-
146
-
147
-
148
-
149
-
150
 |
 |
