Icom GM800 Instruction Manual - Page 8
■ Remote Controller front panel, CHANNEL/GROUP SELECTOR [CH/GRP]
 |
View all Icom GM800 manuals
Add to My Manuals
Save this manual to your list of manuals |
Page 8 highlights
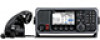
2 PANEL DESCRIPTION ■ Remote Controller front panel q SPEAKER w FUNCTION DISPLAY (p. 6) er t y u i o MIC CONNECTOR SOFTWARE KEYS (p. 4) !3 !2 !1 !0 q DISTRESS KEY [DISTRESS] Hold down for 3 seconds to transmit a Distress call. (p. 30) w ENTER KEY [ENT] Push to set the entered data, selected item, and so on. e LEFT AND RIGHT KEYS Push to scroll the Software Key functions. (p. 4) In the Character or Number Entry mode, push to select a character or number in the table. r UP AND DOWN KEYS Push to select an operating channel, menu items, menu settings, and so on. t KEYPAD Push to enter numbers, letters or symbols. y TUNE KEY [TUNE] Push to turn ON the Automatic Antenna Tuner function, or to go through (bypass) the tuning circuit. (p. 16) Hold down to start manual tuning. L After tuning is completed, "TUNE" is displayed. L When the tuner cannot tune the antenna, "THRU" is displayed. u POWER KEY [ ] Hold down for 1 second to turn the transceiver ON or OFF. 3 i VOLUME DIAL [VOL] Rotate to adjust the speaker volume level. Push 1 ~ 5 times to display the setting screens. Pushing once Pushing twice Pushing 3 times Pushing 4 times Pushing 5 times The Volume Setting window is displayed. The NB Level Setting window is displayed. The S-SQL Level Setting window is displayed. The RF Gain Setting window is displayed. The Backlight Settings window is displayed. o RX/TX KEY [RX/TX] Push to set a temporary operating frequency. (p. 17) !0 DSC SCAN KEY [D-SCAN] Push to start a DSC scan. (p. 12) !1 CLEAR KEY [CLR] Push to cancel the entered data, or to return to the previous screen. !2 CHANNEL/GROUP SELECTOR [CH/GRP] Push to select the Channel Select mode or the Group Select mode. (p. 11) Push to set the entered data, selected item, and so on. Rotate to select the operating channel, menu items, menu settings, and so on. !3 MENU KEY [MENU] Push to enter or exit the Menu screen.
-
 1
1 -
2
-
 3
3 -
 4
4 -
 5
5 -
 6
6 -
 7
7 -
 8
8 -
 9
9 -
 10
10 -
 11
11 -
 12
12 -
 13
13 -
14
-
15
-
16
-
17
-
18
-
19
-
20
-
21
-
22
-
23
-
24
-
25
-
26
-
27
-
28
-
29
-
30
-
31
-
32
-
33
-
34
-
35
-
36
-
37
-
38
-
39
-
40
-
41
-
42
-
43
-
44
-
45
-
46
-
47
-
48
-
49
-
50
-
51
-
52
-
53
-
54
-
55
-
56
-
57
-
58
-
59
-
60
-
61
-
62
-
63
-
64
-
65
-
66
-
67
-
68
-
69
-
70
-
71
-
72
-
73
-
74
-
75
-
76
-
77
-
78
-
79
-
80
-
81
-
82
-
83
-
84
-
85
-
86
-
87
-
88
-
89
-
90
-
91
-
92
-
93
-
94
-
95
-
96
-
97
-
98
-
99
-
100
 |
 |
