Icom IC-GM1600 Instruction Manual - Page 8
DO
 |
View all Icom IC-GM1600 manuals
Add to My Manuals
Save this manual to your list of manuals |
Page 8 highlights
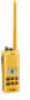
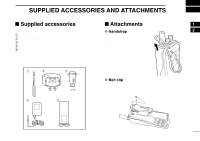
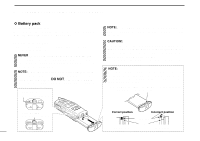
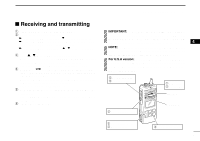
2 SUPPLIED ACCESSORIES AND ATTACHMENTS LOCK LOCK ï Battery pack To remove the battery pack: Turn the screw counterclockwise, then pull the battery pack in the direction of the arrow as shown below. To attach the battery pack: Insert the battery pack in the IC-GM1600 completely, then turn the screw clockwise. NEVER remove or insert the battery pack when the transceiver is wet or soiled. This may result water or dust getting into the transceiver/battery pack and may result in the transceiver being damaged. NOTE: When the lock screw does not easily turn (feels tight), check to ensure the battery pack is sufficiently inserted to the transceiver. DO NOT bang or cause high impact to the battery pack, as this may damage the battery pack/or the transceiver. Screw position when removing battery OPEN Screw position when attaching battery OPEN 3 NOTE: When removing or attaching the battery pack, use a coin or flat-blade screwdriver to loosen or tighten the bottom screw. CAUTION!: When attaching or removing a battery pack, make sure the rubber seal is set in the groove of the battery pack correctly. If the seal is not neatly in the groove it may be damaged when attaching the battery pack. If the seal is damaged, waterproofing is not guaranteed. NOTE: When attaching a battery pack, make sure dust or else does not adhere to the rubber seal. If dust or anything else is on the seal when attaching a battery pack, the water resistant seal may be compromised. Make sure both the rubber seal (purple) is set into the groove correctly and dust or else does not adhere to it. Correct position Incorrect position Battery pack Rubber seal Groove Battery pack
-
 1
1 -
2
-
 3
3 -
 4
4 -
 5
5 -
 6
6 -
 7
7 -
 8
8 -
 9
9 -
 10
10 -
 11
11 -
 12
12 -
 13
13 -
14
-
15
-
16
-
17
-
18
-
19
-
20
-
21
-
22
-
23
-
24
-
25
-
26
-
27
-
28
-
29
-
30
-
31
-
32
 |
 |
