Image Fitness 10.6qi English Manual - Page 26
Unplug The Power Cord
 |
View all Image Fitness 10.6qi manuals
Add to My Manuals
Save this manual to your list of manuals |
Page 26 highlights
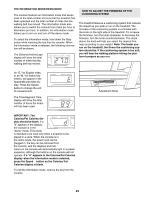
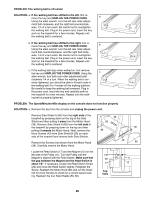
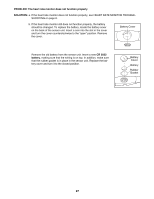
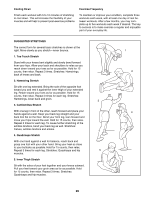
PROBLEM: The walking belt is off-center SOLUTION: a. If the walking belt has shifted to the left, first re- a move the key and UNPLUG THE POWER CORD. Using the allen wrench, turn the left rear roller adjust- ment bolt clockwise, and the right bolt counterclock- wise, 1/4 of a turn each. Be careful not to overtighten the walking belt. Plug in the power cord, insert the key and run the treadmill for a few minutes. Repeat until the walking belt is centered. b. If the walking belt has shifted to the right, first remove the key and UNPLUG THE POWER CORD. b Using the allen wrench, turn the left rear roller adjust- ment bolt counterclockwise, and the right bolt clock- wise, 1/4 of a turn each. Be careful not to overtighten the walking belt. Plug in the power cord, insert the key and run the treadmill for a few minutes. Repeat until the walking belt is centered. c. If the walking belt slips when walked on, first remove the key and UNPLUG THE POWER CORD. Using the c allen wrench, turn both rear roller adjustment bolts clockwise 1/4 of a turn. When the walking belt is cor- rectly tightened, you should be able to lift each side of the walking belt 3 to 4 inches off the walking platform. Be careful to keep the walking belt centered. Plug in the power cord, insert the key and carefully walk on the treadmill for a few minutes. Repeat until the walk- ing belt is properly tightened. PROBLEM: The Speed/Minutes-Mile display on the console does not function properly SOLUTION: a. Remove the key from the console and unplug the power cord. Remove Side Shield A (60) from the right side of the treadmill by pressing down on the top of the Side 39 Shield and then pulling it away from the Motor Hood 60 (39). Remove Side Shield A (60) from the left side of the treadmill by pressing down on the top and then 59 pulling it towards the Motor Hood. Next, remove the 59 three Screws (43) from Side Shield B (59) on each side of the treadmill and remove both Side Shields. Remove the Screws (not shown) from the Motor Hood (39). Carefully remove the Motor Hood. 43 60 Locate the Reed Switch (17) and the Magnet (12) on the left side of the Pulley (11). Turn the Pulley until the 1/8Ó Magnet is aligned with the Reed Switch. Make sure that 26 11 the gap between the Magnet and the Reed Switch is about 1/8Ó. If necessary, loosen the Reed Switch Screw 17 12 (26) and move the Reed Switch slightly. Retighten the Screw. Reattach the Motor Hood (39) and run the treadmill for a few minutes to check for a correct speed reading. Reattach the four Side Shields (59, 60). Top View 26
-
 1
1 -
2
-
3
-
4
-
5
-
6
-
7
-
8
-
9
-
10
-
11
-
12
-
13
-
14
-
15
-
16
-
17
-
18
-
19
-
20
-
 21
21 -
 22
22 -
 23
23 -
 24
24 -
 25
25 -
 26
26 -
 27
27 -
 28
28 -
 29
29 -
 30
30 -
 31
31 -
32
-
33
-
34
 |
 |
