Image Fitness 760 Treadmill English Manual - Page 9
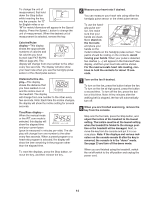
Set the Console Base 101 on the Uprights 29, 30.
 |
View all Image Fitness 760 Treadmill manuals
Add to My Manuals
Save this manual to your list of manuals |
Page 9 highlights
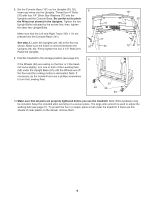
8. Set the Console Base (101) on the Uprights (29, 30). Insert any wires into the Uprights. Thread four 4" Bolts (76) with four 1/4" Silver Star Washers (77) into the Uprights and the Console Base. Be careful not to pinch the Wires (not shown) in the Uprights. Tighten the two Upright Bolts indicated by the arrows first; then, tighten the other two Upright Bolts. Make sure that the Left and Right Trays (109, 111) are pressed into the Console Base (101). See step 3. Lower the Uprights (29, 30) to the floor as shown. Make sure the frame is centered between the Uprights (29, 30). Firmly tighten the four 2 1/2" Bolts (61) Raise the Uprights. 9. Fold the treadmill to the storage position (see page 24). If the Wheels (94) are resting on the floor or if the treadmill rocks slightly, turn one or both of the Leveling Feet (95) under the Upright Base (97) until the Wheels are off the floor and the rocking motion is eliminated. Note: If necessary, tip the treadmill and use a phillips screwdriver to turn the Leveling Feet. 8 101 29 111 109 77 76 30 77 76 77 9 97 94 95 94 10.Make sure that all parts are properly tightened before you use the treadmill. Note: Extra hardware may be included. Keep the included allen wrenches in a secure place. The large allen wrench is used to adjust the walking belt (see page 27). To protect the floor or carpet, place a mat under the treadmill. If there are thin sheets of clear plastic on the decals, remove them. 9
-
 1
1 -
2
-
3
-
 4
4 -
 5
5 -
 6
6 -
 7
7 -
 8
8 -
 9
9 -
 10
10 -
 11
11 -
 12
12 -
 13
13 -
 14
14 -
15
-
16
-
17
-
18
-
19
-
20
-
21
-
22
-
23
-
24
-
25
-
26
-
27
-
28
-
29
-
30
-
31
-
32
-
33
-
34
 |
 |
