Image Fitness Renew 815 Spa Canadian English Manual - Page 8
View of Inside of Wet Side Jet Pack
 |
View all Image Fitness Renew 815 Spa manuals
Add to My Manuals
Save this manual to your list of manuals |
Page 8 highlights
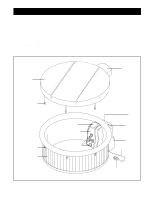
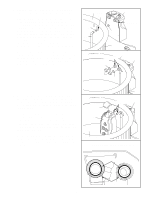
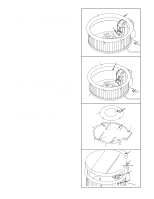
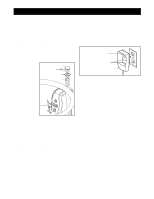
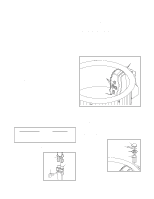
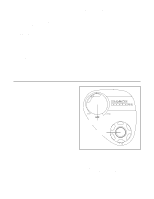
2. Orient the dry side jet pack (A) as shown and place it near the three holes in the Inflatable Liner (29). Slide the Temperature Probe Gasket (46) over the connector threads on the Temperature Probe Assembly (30). Insert the wire (not shown) through the small hole in the Inflatable Liner (29) and then push the Temperature Probe Assembly into the hole. Make sure that the threads on the connector are pushed fully through the vinyl liner. Firmly tighten the Temperature Probe Nut (47) onto the connector threads. Connect the wire from the Temperature Probe to the receptacle on the dry side jet pack (A). 3. Move the dry side jet pack (A) against the wall of the tub. Pull the two connectors on the dry side jet pack through the large holes in the Inflatable Liner (29). Slide a Wet Side Gasket (48) onto each connector. Firmly tighten a Wet Side Nut (49) onto each connector. 2 29 Small Hole 46 47 30 A Receptacle 9 3 29 Connectors A 48 49 48 4. Position the wet side jet pack (B) as shown. Place an O-ring (52) in the groove of each connector on the wet side jet pack. Make sure that the O-rings are positioned securely in the grooves, as shown in drawing 4A. Attach the threaded collar on the right side (as seen in drawing 4A) of the wet side jet pack (B) to the corresponding connector on the dry side jet pack (A). Attach the left side in the same manner. Important: If the threaded collars are not fully tightened, the spa will not function. Position the Pillow (26) over the hole in the top of the wet side jet pack (B). Push the fasteners on the Pillow through the appropriate holes in the wet side jet pack. 4 26 B 29 9 O-rings (52) A 4A View of Inside of Wet Side Jet Pack O-rings (52) Threaded Collar 8
-
 1
1 -
2
-
 3
3 -
 4
4 -
 5
5 -
 6
6 -
 7
7 -
 8
8 -
 9
9 -
 10
10 -
 11
11 -
 12
12 -
 13
13 -
14
-
15
-
16
-
17
-
18
-
19
-
20
-
21
-
22
-
23
 |
 |
