Image Fitness Renew 815 Spa Canadian English Manual - Page 9
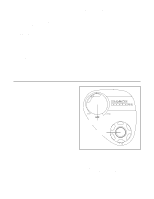
SPA JET UNIT on Important: Prime
 |
View all Image Fitness Renew 815 Spa manuals
Add to My Manuals
Save this manual to your list of manuals |
Page 9 highlights
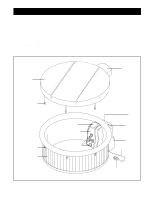
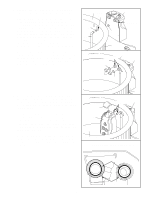
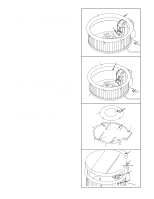
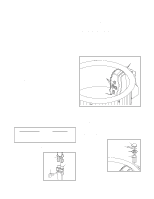
5. Attach the nozzle on the air pump to the valve on the floor of the Inflatable Liner (29). Use the air 5 pump to fill the bottom of the Inflatable Liner with air. Be extremely careful not to puncture the Liner. You will need to operate the pump by hand for this step. Next, attach the nozzle on the air pump to the valve on the bolster of the Inflatable Liner (29). Fill the bolster until there are no wrinkles. 29 Air Valve Air Valve 6. Before filling the spa with water, make sure that the spa is in the desired location, that it can easily be serviced, and that the cover can easily be removed. Once the spa is filled, it will have to be drained before it can be moved. Using a garden hose or other clean water source, fill the spa until there are 2 to 3 inches of water in the spa. Next, smooth out the wrinkles in the sides and bottom of the Inflatable Liner (29). Although a few wrinkles are normal, it is very important to smooth out as many wrinkles as possible. Resume filling the spa until the water reaches the fill line. Do not overfill the spa. Note: When the spa is filled, the Spa Surround (9) may bow slightly; this is a normal condition. After the spa is filled, the spa jet unit must be primed before the spa is used (see PRIMING THE SPA JET UNIT on page 10). Important: Prime the spa jet unit before continuing to step 7. 7. Use the air pump to fill both chambers of the Inflatable Cover (4) with air. Slide one of the four straps inside the Spa Cover (11) through one of the loops on the Inflatable Cover (4). Attach the latch on the strap to the buckle on the other end of the strap. Attach the other three straps to the loops on the Inflatable Cover in the same way. 8. Place the Spa Cover (11) over the spa and line up the bulge on the Spa Cover with the console on the dry side jet pack. Snap each of the six latches on the Spa Cover into the buckles on the Spa Surround (9). 6 29 Fill Line 9 7 4 11 Air Valve Latches and Buckles Pouch for Jet Plugs 8 Bulge Console 11 Latch 9 Buckle 9
-
 1
1 -
2
-
3
-
 4
4 -
 5
5 -
 6
6 -
 7
7 -
 8
8 -
 9
9 -
 10
10 -
 11
11 -
 12
12 -
 13
13 -
 14
14 -
15
-
16
-
17
-
18
-
19
-
20
-
21
-
22
-
23
 |
 |
