InSinkErator Model Hot1 Owners Manual - Page 2
What You Should Know Before You Begin, What You Need To Get Started, Components In This Package - parts
 |
View all InSinkErator Model Hot1 manuals
Add to My Manuals
Save this manual to your list of manuals |
Page 2 highlights
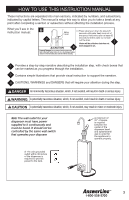
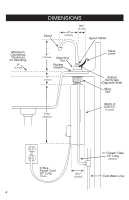
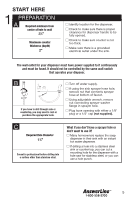
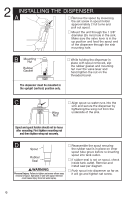
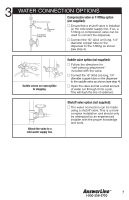
WHAT YOU SHOULD KNOW BEFORE YOU BEGIN I For your satisfaction and safety, read all instructions, cautions, warnings and dangers before installing or using this instant hot water dispenser. I This particular unit is not intended for commercial use. I Make sure that all electrical wiring and connections conform to local codes. I A standard 115-volt grounded electrical outlet is required under the sink for the dispenser's electrical power. I The wall outlet powering your dispenser must have power supplied to it continuously. I This outlet must be fused and should not be controlled by the same wall switch that operates the disposer, unless you have a SinkTop Switch™ from InSinkErator®. I Moving parts inside the tank causing a rattling noise is normal. I This unit does not contain a drain plug and should not be installed where periodic draining is required, such as summer homes. WHAT YOU NEED TO GET STARTED Equipment Required: I Compression fitting, T-fitting or saddle valve I Adjustable wrench I Phillips and flat blade screwdrivers I Pencil I Tape Measure Equipment You May Need: I Hole punch I Hole saw I Basin wrench I Drill I Level If you intend to use the sprayer hole in your sink for your dispenser, you may need a basin wrench and a 1/8" plug or a 1/4" cap (not supplied) for the faucet spray hose line. See Step 1-B. If you need to cut a mounting hole in your stainless steel sink, you may need a 11⁄4" - 11⁄2" hole saw made for cutting stainless steel or a hole punch. Consult a professional if you are drilling into a surface other than stainless steel. COMPONENTS IN THIS PACKAGE Wing Nut Brass Nut Mounting Nut Rubber Gasket Ferrule 2
-
 1
1 -
 2
2 -
 3
3 -
 4
4 -
 5
5 -
 6
6 -
 7
7 -
 8
8 -
9
-
10
-
11
-
12
-
13
-
14
-
15
-
16
-
17
-
18
-
19
-
20
-
21
-
22
-
23
-
24
-
25
-
26
-
27
-
28
-
29
-
30
-
31
-
32
-
33
-
34
-
35
-
36
 |
 |