Insignia NS-19E320A13 User Manual (English) - Page 8
Introduction, Installing the stand or wall-mount bracket, Installing the stand, Installing a wall- - model
 |
View all Insignia NS-19E320A13 manuals
Add to My Manuals
Save this manual to your list of manuals |
Page 8 highlights
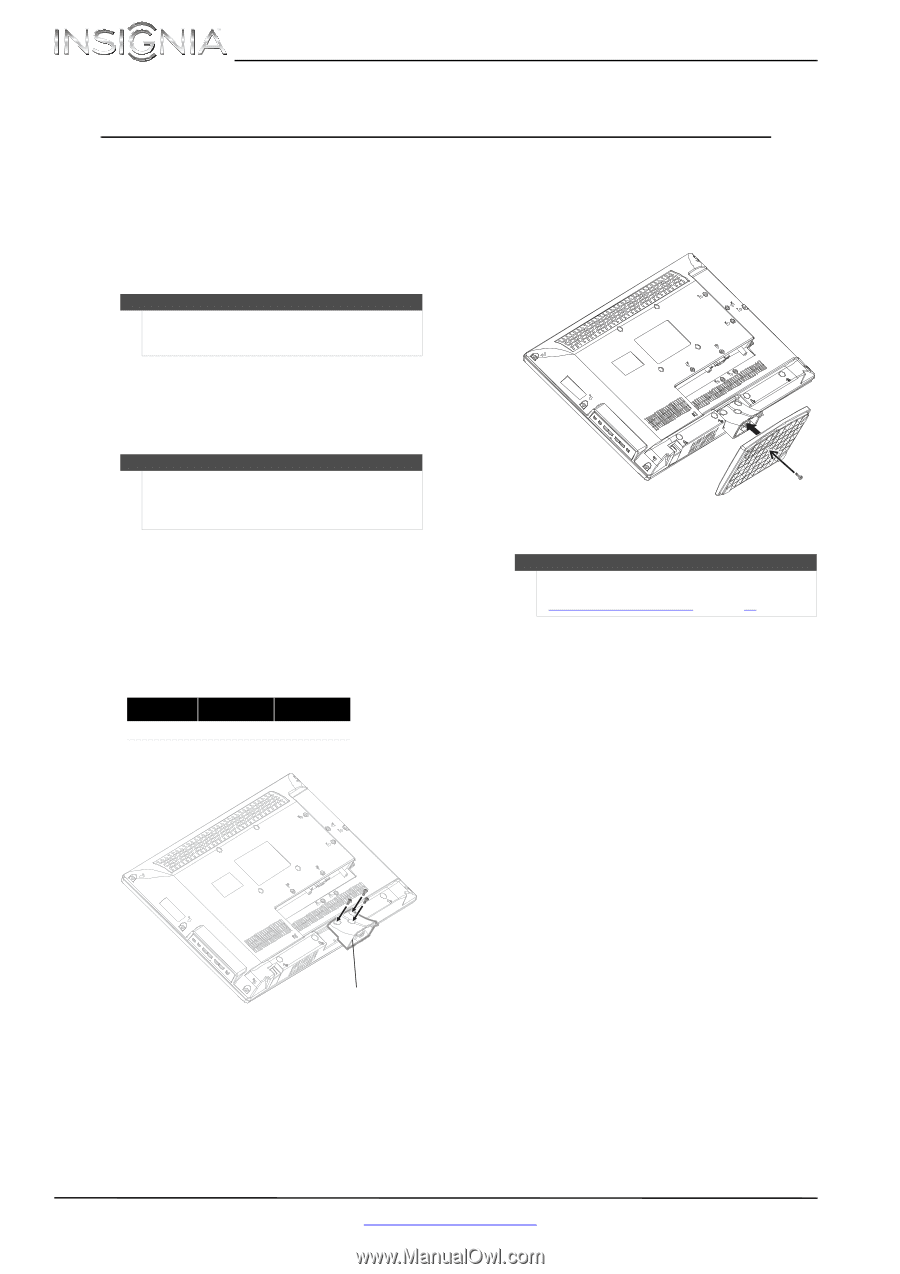
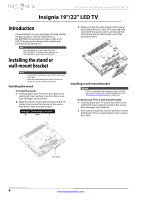
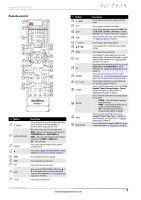
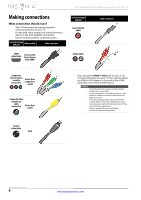
NS-19E320A13/NS-22E340A13 Insignia 19"/22" LED TV Insignia 19"/22" LED TV Introduction Congratulations on your purchase of a high-quality Insignia product. Your NS-19E320A13 or NS-22E340A13 represents the state of the art in LED TV design and is designed for reliable and trouble-free performance. Note Most illustrations in this guide show the NS-19E320A13. The same steps apply to the NS-22E340A13 unless otherwise noted. Installing the stand or wall-mount bracket 3 Make sure that the wide portion of the stand base faces the front of your TV, then align the stand with the stand column and secure the stand to the stand column with one of the provided screws. Notes • • If you plan to wall-mount your TV, do not install the stand. Store the stand and stand screws in case you decide to use the stand in the future. Installing the stand To install the stand: 1 Carefully place your TV screen face-down on a cushioned, clean surface to protect the screen from damages and scratches. 2 Align the stand column with the back of the TV screen, then secure the column to the screen with three of the provided screws. Screw type Screw length # of screws M4 14 mm 4 Installing a wall-mount bracket Warning This TV is intended to be supported by a UL Listed wall mount bracket with suitable weight/load. (See "Miscellaneous (both models)" on page 53.) To attach your TV to a wall-mount bracket: 1 Carefully place your TV screen face-down on a cushioned, clean surface to protect the screen from damages and scratches. 2 If the stand is attached, remove the three screws holding the TV to its stand column, then remove the stand. Stand column 4 www.insigniaproducts.com
-
 1
1 -
2
-
 3
3 -
 4
4 -
 5
5 -
 6
6 -
 7
7 -
 8
8 -
 9
9 -
 10
10 -
 11
11 -
 12
12 -
 13
13 -
14
-
15
-
16
-
17
-
18
-
19
-
20
-
21
-
22
-
23
-
24
-
25
-
26
-
27
-
28
-
29
-
30
-
31
-
32
-
33
-
34
-
35
-
36
-
37
-
38
-
39
-
40
-
41
-
42
-
43
-
44
-
45
-
46
-
47
-
48
-
49
-
50
-
51
-
52
-
53
-
54
-
55
-
56
-
57
-
58
-
59
-
60
-
61
 |
 |