Insignia NS-32E859A11 User Manual (English) - Page 17
Front, Side, Button, Description - picture settings
 |
View all Insignia NS-32E859A11 manuals
Add to My Manuals
Save this manual to your list of manuals |
Page 17 highlights
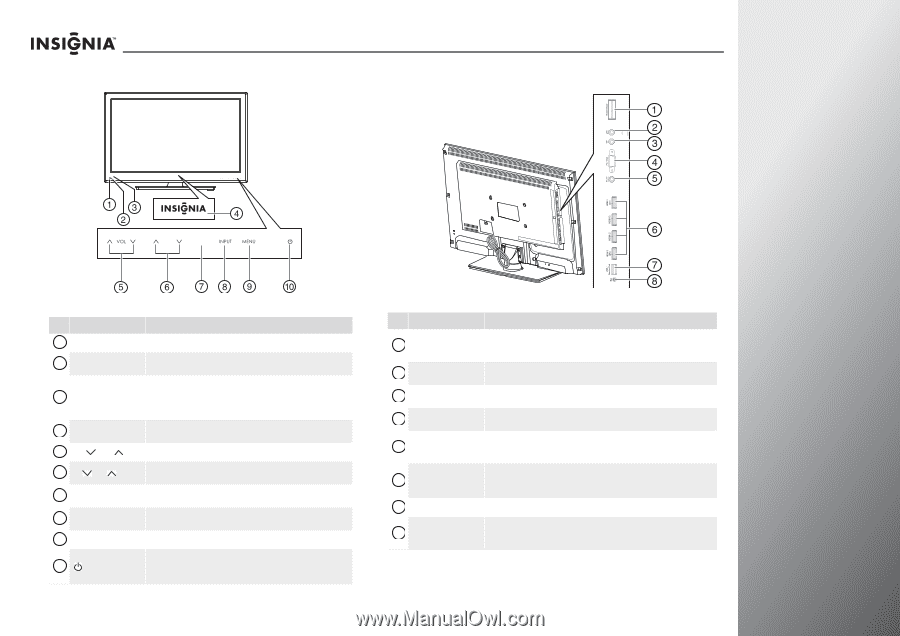
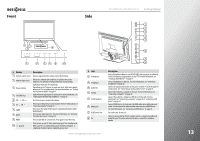
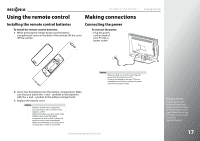
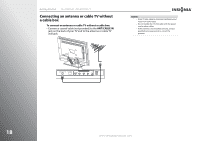
Front Side NS-32E859A11/NS-42E859A11 Getting Started CH GAME CH GAME # Button Description 1 Remote control sensor Receives signals from the remote control. Do not block. 2 Ambient light sensor 3 Power indicator 4 INSIGNIA logo Detects the ambient light conditions to optimize the picture brightness for optimum viewing and provides energy savings. Lights blue when your TV is turned on. Depending on the TV power on mode you select, lights red or purple when your TV is in standby mode. For more information, see "Setting the TV power on mode" on page 93. Lights when the logo feature is turned on. For more information, see "Adjusting the INSIGNIA logo brightness" on page 92. 5 VOL /VOL Press to decrease or increase the volume. 6 CH /CH 7 GAME 8 INPUT Press to go to the previous or next channel. For more information, see "Selecting a channel" on page 37. Press to use the Game mode feature for optimal performance while playing games. Press to open input source list. For more information, see "Selecting the video input source" on page 35. 9 MENU Press to open the on-screen menu. Press again to close the menu. 10 (power) Press to turn on your TV. Press again to put your TV in standby mode. When your TV is in standby mode, power still flows through it. To completely disconnect power, unplug the power cord. # Jack 1 Rocketboost 2 Headphone 3 Audio Out 4 PC/VGA 5 PC/DVI Audio In 6 HDMI jacks 7 USB/Service Port 8 INc www.insigniaproducts.com Description Insert a Rocketboost Wireless card (RF-RBCARD, sold seperately) to wirelessly connect Rocketboost audio products to your TV. For more information, see "Setting up Rocketboost™" on page 51. Connect headphones to this jack. For more information, see "Connecting headphones" on page 25. Connect an analog sound system to this jack to send the TV audio through the sound system. See "Connecting an analog audio receiver" on page 26. Connect the video for a computer to this jack. For more information, see "Connecting a computer" on page 24. Connect the audio for a computer or DVI device to this jack. For more information, see "Connecting a computer" on page 24 or "Connecting a DVI device" on page 21. Connect HDMI devices to these jacks. An HDMI cable carries both video and sound. You do not need to make an audio connection for an HDMI device. For more information, see "Connecting an HDMI device" on page 20. For service only. Do not use. Connect a device that has RS232 controls, such as a connected soundbar. By doing this your TV remote control will be able to control the soundbar's volume. 13
-
 1
1 -
2
-
3
-
4
-
5
-
6
-
7
-
8
-
9
-
10
-
11
-
 12
12 -
 13
13 -
 14
14 -
 15
15 -
 16
16 -
 17
17 -
 18
18 -
 19
19 -
 20
20 -
 21
21 -
 22
22 -
23
-
24
-
25
-
26
-
27
-
28
-
29
-
30
-
31
-
32
-
33
-
34
-
35
-
36
-
37
-
38
-
39
-
40
-
41
-
42
-
43
-
44
-
45
-
46
-
47
-
48
-
49
-
50
-
51
-
52
-
53
-
54
-
55
-
56
-
57
-
58
-
59
-
60
-
61
-
62
-
63
-
64
-
65
-
66
-
67
-
68
-
69
-
70
-
71
-
72
-
73
-
74
-
75
-
76
-
77
-
78
-
79
-
80
-
81
-
82
-
83
-
84
-
85
-
86
-
87
-
88
-
89
-
90
-
91
-
92
-
93
-
94
-
95
-
96
-
97
-
98
-
99
-
100
-
101
-
102
-
103
-
104
-
105
-
106
-
107
-
108
-
109
-
110
-
111
-
112
-
113
-
114
-
115
-
116
-
117
-
118
-
119
-
120
-
121
-
122
-
123
 |
 |