Insignia NS-DSC10B User Manual (English) - Page 14
Using the menus - 10mp digital camera
 |
UPC - 600603123153
View all Insignia NS-DSC10B manuals
Add to My Manuals
Save this manual to your list of manuals |
Page 14 highlights
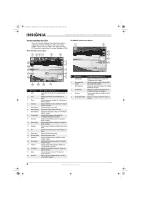
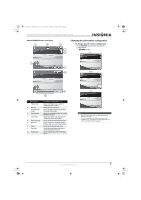
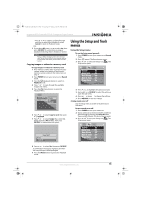
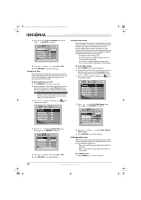
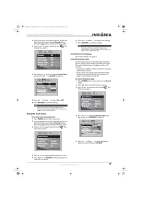
NS-DSC10A-10B_09-0323_MAN_V2.book Page 10 Monday, April 27, 2009 8:42 AM Insignia NS-DSC10A and NS-DSC10B 10 Megapixel Digital Cameras 2 Press (record) until the video icon appears in the upper left of the LCD. Movie icon 02:03:04 x4.0 7 Press OK/DISP to save the settings. 8 Press (menu) again to close the menu. Setting picture quality The quality function lets you adjust the quality settings of your photos before you capture them. Quality determines the amount of compression applied to your photos. More compression results in a less detailed image. However, the higher the quality, the more memory space is required to store a single image. 3 Press the shutter button to begin recording. • Press to zoom in or zoom out an image. • To pause a recording, press up . • To continue recording, press again. 4 To stop recording, press the shutter button again. Note • • • When the maximum capacity for a single video has been reached, press the shutter button again to continue recording. The camera will automatically stop recording when the memory capacity is full. When recording videos, audio recording mutes during zoom operations. Using the menus Using the Record menu If you are in Record mode, you can access the Record menu by pressing (menu) on your camera. When the menu is displayed, use the 4-way navigation control and the OK/DISP button to move through menu selections and apply your desired settings. To close the menu anytime, press (menu) again. To use the Record menu: 1 Press POWER to turn your camera on. 2 Press the Record button to ensure the camera is in Record mode. 3 Press (menu). The Record menu opens. Quality Resolution ISO Color Balance Stabilizer Fine High Auto Sunny Off 4 Press or to highlight the option you want. 5 Press right or OK/DISP to open the sub-menu. 6 Press up or down to change the settings. Quality Resolution ISO Color Balance SFuinpFeeirnFeine FHinigeHh igh NAoAurumtoal Sunny Stabilizer Off Higher quality & fewer pictures or The table below shows the available quality settings for still images. Icon Item Compression rate Super fine 4x compression Fine Normal 8x compression 12x compression Setting picture resolution The resolution function is used to set the resolution before you capture an image. Changing the resolution affects the number of images that can be stored in your memory card. The higher the resolution, the more memory space is required. High resolution images are ideal for printing and other applications. Quality Resolution ISO Color Balance HFiignhFeine MHeigdhHiuigmh LAoAuwuto Sunny Stabilizer Off Sets image detail (3MP, 7MP & 10MP) The table below shows the available resolution settings. Icon Item 10M High Image size 3648 x 2736 (10 megapixels) 7M Medium 3072 x 2304 (7 megapixels) 3M Low 2048 x 1536 (3 megapixels) 10 www.insigniaproducts.com
-
 1
1 -
2
-
3
-
4
-
5
-
6
-
7
-
8
-
 9
9 -
 10
10 -
 11
11 -
 12
12 -
 13
13 -
 14
14 -
 15
15 -
 16
16 -
 17
17 -
 18
18 -
 19
19 -
20
-
21
-
22
-
23
-
24
 |
 |
