Insignia NS-HWMC1848 User Guide - Page 32
WARNING, to attach
 |
View all Insignia NS-HWMC1848 manuals
Add to My Manuals
Save this manual to your list of manuals |
Page 32 highlights
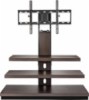
3-in-1 TV STAND Step 7: Position the TV stand and install the tipping restraint hardware kit 1 Position the assembled stand against a wall where you plan to use it. 2 If necessary, adjust the leveling feet to level the TV stand. 3 Follow the instructions printed on the bag containing the tipping restraint hardware kit (GG) to attach the restraint hardware to the wall and the stand. WARNING: It is very important that the tipping restraint be installed correctly. Failure to do this could result in your TV/stand assembly falling forward, resulting in damage to equipment or personal injury. Anchor Anchor Wall Wall Wall Nut and washers Long screw Leveling feet You'll need: GG (1) Power drill 3/8" masonry or wood drill bit Level 32 www.insigniaproducts.com
-
 1
1 -
2
-
3
-
4
-
5
-
6
-
7
-
8
-
9
-
10
-
11
-
12
-
13
-
14
-
15
-
16
-
17
-
18
-
19
-
20
-
21
-
22
-
23
-
24
-
25
-
26
-
 27
27 -
 28
28 -
 29
29 -
 30
30 -
 31
31 -
 32
32 -
 33
33 -
 34
34 -
 35
35
 |
 |
