Insignia NS-PMMD22 User Guide - Page 8
STEP 4: Attaching the monitors
 |
View all Insignia NS-PMMD22 manuals
Add to My Manuals
Save this manual to your list of manuals |
Page 8 highlights
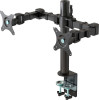
STEP 4: Attaching the monitors Note: Monitors can be oriented either horizontally or vertically. Depending on the VESA screw holes on the back of your monitors, you need to use the M4 × 12 mm mounting screws (A) or the M5 × 12 mm mounting screws (B). 1 Determine which mounting screws you need (A or B) by hand-threading a screw into a VESA screw hole. Do not force the screw to fit. 2 Lock the monitor plates into position with the 5 x 5 Allen wrench (G), then center the back of the first monitor on the monitor plate at the end of the monitor support bar. 3 Align the mounting holes on the monitor with the holes on the monitor plate, then attach the monitor to the monitor plate using four screws (A or B) with washers (E). Tighten the screws firmly with a Phillips screwdriver, but do not overtighten. Repeat for the second monitor. / 8 www.insigniaproducts.com
-
 1
1 -
2
-
 3
3 -
 4
4 -
 5
5 -
 6
6 -
 7
7 -
 8
8 -
 9
9 -
 10
10 -
 11
11
 |
 |
