Insignia NS-UZ17WH0 User Guide - Page 8
Leveling your freezer, Providing a proper power supply, Using a 3-prong plug and outlet
 |
View all Insignia NS-UZ17WH0 manuals
Add to My Manuals
Save this manual to your list of manuals |
Page 8 highlights
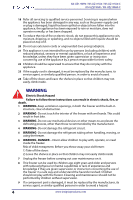
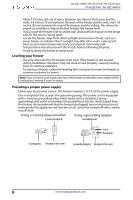
NS-UZ17WH0 / NS-UZ17SS0 / NS-UZ17SS0-C NS-UZ21WH0 / NS-UZ21WH0-C • Allow 7.9 inches (20 cm) of space between the sides of the freezer and the walls, 3.9 inches (10 cm) between the back of the freezer and the wall, and 11.8 inches (30 cm) between the top of the freezer and the ceiling. This allows for proper air ventilation. Adjust the feet to keep the freezer level. • If you locate the freezer next to a fixed wall, allow sufficient space on the hinge side for the door to swing open. • Locate the freezer away from direct sunlight and sources of heat, such as a stove, heater, or radiator. Direct sunlight may affect the acrylic coating and heat sources may increase electrical consumption. Extremely cold temperatures may also prevent the freezer from performing properly. • Avoid locating the freezer in moist areas. Leveling your freezer • It is very important for the freezer to be level. If the freezer is not leveled during installation, the doors may not close or seal properly, causing cooling, frost, or moisture problems. • To level your freezer, rotate the leveling feet clockwise (to raise) the freezer or counter-clockwise (to lower). Note: Have someone push against the top of the freezer to help take some weight off the leveling foot, making it easier to adjust. Providing a proper power supply Check your local power source. This freezer requires a 115 V, 60 Hz power supply. Use a receptacle that accepts the grounding prong. The power cord is equipped with a 3-prong (grounding) plug which mates with a standard 3-prong (grounding) wall outlet to minimize the possibility of electric shock hazard from this freezer. We recommend that the freezer be plugged into an electrical circuit serving only this appliance and that the circuit cannot be turned off with a switch or pull-chain. Using a 3-prong plug and outlet Using a grounding adapter 3-prong receptacle Grounding lead Screw Receptacle 3-prong plug Receptacle box cover Grounding adapter Receptacle box cover 8 www.insigniaproducts.com
-
 1
1 -
2
-
 3
3 -
 4
4 -
 5
5 -
 6
6 -
 7
7 -
 8
8 -
 9
9 -
 10
10 -
 11
11 -
 12
12 -
 13
13 -
14
-
15
-
16
-
17
-
18
-
19
 |
 |