Intel SRCU42E Hardware User Guide - Page 20
Quick Installation, Detailed Installation - drivers
 |
UPC - 735858168403
View all Intel SRCU42E manuals
Add to My Manuals
Save this manual to your list of manuals |
Page 20 highlights
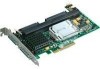
2.2 Quick Installation The following steps are for for experienced computer users/installers. Section 2.3, "Detailed Installation", contains detailed steps. 1) Attach the Intel® Portable Cache Module (Optional, required to enable Write Back Cache) or attach the memory DIMM to the RAID controller if the DIMM is not preinstalled. 2) Turn power off to the server and all hard disk drives, enclosures, and system components and remove the PC power cord. 3) Follow the instructions in the host system documentation to open the cabinet of the host system. 4) Determine the SCSI ID and SCSI termination requirements. 5) Install the RAID Controller SRCU42E in the server, connect SCSI devices to it, and set termination correctly on the SCSI channel(s). 6) Perform a safety check: - Ensure that all cables are properly attached. - Ensure that the RAID Controller SRCU42E is properly installed. - Close the cabinet of the host system. 7) Turn power on after completing the safety check. 2.3 Detailed Installation This section provides detailed instructions for installing the Intel® RAID Controller SRCU42E. 1) Unpack Unpack and remove the RAID Controller SRCU42E. Inspect it for damage. If it appears damaged, or if any items listed below are missing, contact your Intel support representative. The Intel® RAID Controller SRCU42E is shipped with: ◊ The Resource CD, which contains Intel RAID drivers for supported operating systems, an electronic version of this guide, and other related documentation. ◊ A license agreement 2) Attach the Intel® Portable Cache Module (Optional, required to enable Write Back Cache) or attach the memory DIMM to the controller if the DIMM is not pre-installed. a. Remove the Intel® Portable Cache Module or memory DIMM from its packaging. b. Open both DIMM socket levers on the RAID controller, noted by letter B in the figure below. c. Note the location of the alighment notch and insert the Intel® Portable Cache Module or memory DIMM, lining up the slot in the Intel® Portable Cache Module or DIMM with the alignment notch. d. Push the Intel® Portable Cache Module or DIMM firmly into the card. See letter A in Figure 2.1. e. Make sure the socket levers latch securely. Quick Installation 20
-
 1
1 -
2
-
3
-
4
-
5
-
6
-
7
-
8
-
9
-
10
-
11
-
12
-
13
-
14
-
 15
15 -
 16
16 -
 17
17 -
 18
18 -
 19
19 -
 20
20 -
 21
21 -
 22
22 -
 23
23 -
 24
24 -
 25
25 -
26
-
27
-
28
-
29
-
30
-
31
-
32
-
33
 |
 |
