Intermec PX4i EasyCoder Printer (PX4i and PX6i) RFID Kit Installation Instruct
Intermec PX4i Manual
 |
View all Intermec PX4i manuals
Add to My Manuals
Save this manual to your list of manuals |
Intermec PX4i manual content summary:
- Intermec PX4i | EasyCoder Printer (PX4i and PX6i) RFID Kit Installation Instruct - Page 1
EasyCoder® Printer RFID Kit PX4i, PX6i Installation Instructions - Intermec PX4i | EasyCoder Printer (PX4i and PX6i) RFID Kit Installation Instruct - Page 2
, ShopScan, Smart Mobile Computing, SmartSystems, TE 2000, Trakker Antares, and Vista Powered are either trademarks or registered trademarks of Intermec Technologies Corporation. There are U.S. and foreign patents pending. ii EasyCoder Printer (PX4i and PX6i) RFID Kit Installation Instructions - Intermec PX4i | EasyCoder Printer (PX4i and PX6i) RFID Kit Installation Instruct - Page 3
printer running Fingerprint v8.76.0 or later or IPL v2.76.0 or later. You can download the latest version of firmware from the Intermec web site at www.intermec.com. • A #T10 and a #T20 Torx screwdriver. • A slotted screwdriver. EasyCoder Printer (PX4i and PX6i) RFID Kit Installation Instructions - Intermec PX4i | EasyCoder Printer (PX4i and PX6i) RFID Kit Installation Instruct - Page 4
an authorized service technician. Intermec assumes no responsibility for personal injury or damage to the equipment if the installation is performed by an unauthorized person. Follow standard ESD guidelines to avoid damaging the equipment you are servicing. Before you begin, turn off the printer and - Intermec PX4i | EasyCoder Printer (PX4i and PX6i) RFID Kit Installation Instruct - Page 5
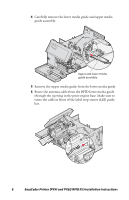
2 Remove the eight #T10 Torx screws and remove the left side door. Screw (8 places) 3 Release the lower media guide latch. Lower media guide latch EasyCoder Printer (PX4i and PX6i) RFID Kit Installation Instructions 5 - Intermec PX4i | EasyCoder Printer (PX4i and PX6i) RFID Kit Installation Instruct - Page 6
media guide from the lower media guide. 6 Route the antenna cable from the RFID lower media guide through the opening in the print engine base. Make sure to route the cable in front of the label stop sensor (LSS) guide bar. 6 EasyCoder Printer (PX4i and PX6i) RFID Kit Installation Instructions - Intermec PX4i | EasyCoder Printer (PX4i and PX6i) RFID Kit Installation Instruct - Page 7
7 Slide the RFID lower media guide into the printer. Insert the pins on the guide into the holes on the print engine base. RFID lower media guide 8 Snap the RFID lower media guide into place. 9 Insert the upper media guide. 10 On the back of the printer, remove the two screws that secure the cover - Intermec PX4i | EasyCoder Printer (PX4i and PX6i) RFID Kit Installation Instruct - Page 8
2 for slot 2. Connector 2 Connector 1 13 Slide the RFID interface board into the printer. 14 Secure the RFID interface board with the two screws you removed in Step 9 or to the printer. 18 Close the front and right side doors. 8 EasyCoder Printer (PX4i and PX6i) RFID Kit Installation Instructions - Intermec PX4i | EasyCoder Printer (PX4i and PX6i) RFID Kit Installation Instruct - Page 9
EasyCoder Printer (PX4i and PX6i) RFID Kit Installation Instructions 9 - Intermec PX4i | EasyCoder Printer (PX4i and PX6i) RFID Kit Installation Instruct - Page 10
10 EasyCoder Printer (PX4i and PX6i) RFID Kit Installation Instructions - Intermec PX4i | EasyCoder Printer (PX4i and PX6i) RFID Kit Installation Instruct - Page 11
- Intermec PX4i | EasyCoder Printer (PX4i and PX6i) RFID Kit Installation Instruct - Page 12
Worldwide Headquarters 6001 36th Avenue West Everett, Washington 98203 U.S.A. tel 425.348.2600 fax 425.355.9551 www.intermec.com © 2009 Intermec Technologies Corporation. All rights reserved. EasyCoder Printer (PX4i and PX6i) RFID Kit Installation Instructions *931-060-001* P/N 931-060-001
-
 1
1 -
 2
2 -
 3
3 -
 4
4 -
 5
5 -
 6
6 -
 7
7 -
8
-
9
-
10
-
11
-
12
 |
 |

EasyCoder® Printer
RFID Kit
PX4i, PX6i
Installation
Instructions