Intermec PX4i EasyCoder Printer (PX4i and PX6i) RFID Kit Installation Instruct - Page 8
M4x5 screw and spacer screw. For slot 1, use the spacer screw, on the main board. For slot 2
 |
View all Intermec PX4i manuals
Add to My Manuals
Save this manual to your list of manuals |
Page 8 highlights
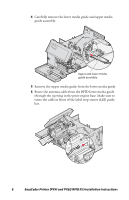
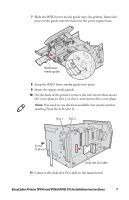
12 Connect the dual slot I/O cable to the RFID interface board. Use the connector 1 for slot 1 and connector 2 for slot 2. Connector 2 Connector 1 13 Slide the RFID interface board into the printer. 14 Secure the RFID interface board with the two screws you removed in Step 9 or with the two included M3x5 screws. 15 Secure the RFID interface board to the circuit board with the M4x5 screw and spacer screw. For slot 1, use the spacer screw on the main board. For slot 2, use the spacer screw in the kit. 16 Connect the antenna cable to the RFID interface board. 17 Attach the left side door to the printer. 18 Close the front and right side doors. 8 EasyCoder Printer (PX4i and PX6i) RFID Kit Installation Instructions
-
 1
1 -
2
-
 3
3 -
 4
4 -
 5
5 -
 6
6 -
 7
7 -
 8
8 -
 9
9 -
 10
10 -
 11
11 -
 12
12
 |
 |

8
EasyCoder Printer (PX4i and PX6i) RFID Kit Installation Instructions
12
Connect the dual slot I/O cable to the RFID interface board.
Use the connector 1 for slot 1 and connector 2 for slot 2.
13
Slide the RFID interface board into the printer.
14
Secure the RFID interface board with the two screws you
removed in Step 9 or with the two included M3x5 screws.
15
Secure the RFID interface board to the circuit board with the
M4x5 screw and spacer screw. For slot 1, use the spacer screw
on the main board. For slot 2, use the spacer screw in the kit.
16
Connect the antenna cable to the RFID interface board.
17
Attach the left side door to the printer.
18
Close the front and right side doors.
C
o
nnec
to
r 1
C
o
nnec
to
r 2