Invacare R51LXP Owners Manual - Page 51
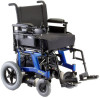
Batteries
 |
View all Invacare R51LXP manuals
Add to My Manuals
Save this manual to your list of manuals |
Page 51 highlights
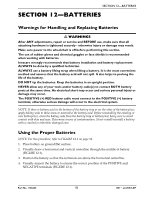
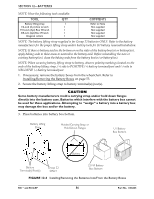
SECTION 12-BATTERIES SECTION 12-BATTERIES Warnings for Handling and Replacing Batteries ƽ WARNINGS After ANY adjustments, repair or service and BEFORE use, make sure that all attaching hardware is tightened securely - otherwise injury or damage may result. Make sure power to the wheelchair is off before performing this section. The use of rubber gloves and chemical goggles or face shields is recommended when working with batteries. Invacare strongly recommends that battery installation and battery replacement ALWAYS be done by a qualified technician. ALWAYS use a battery lifting strap when lifting a battery. It is the most convenient method and assures that the battery acid will not spill. It also helps to prolong the life of the battery. DO NOT tip the batteries. Keep the batteries in an upright position. NEVER allow any of your tools and/or battery cable(s) to contact BOTH battery posts at the same time. An electrical short may occur and serious personal injury or damage may occur. The POSITIVE (+) RED battery cable must connect to the POSITIVE (+) battery terminal, otherwise serious damage will occur to the electrical system. NOTE: If there is battery acid in the bottom of the battery tray or on the sides of the battery(ies), apply baking soda to these areas to neutralize the battery acid. Before reinstalling the existing or new battery(ies), clean the baking soda from the battery tray or battery(ies) being sure to avoid contact with skin and eyes. Determine source of contamination. Never install/reinstall a battery with a cracked or otherwise damaged case. Using the Proper Batteries NOTE: For this procedure, refer to FIGURE 12.1 on page 52. 1. Place battery on ground/flat surface. 2. Visually draw a horizontal and vertical centerline through the middle of battery (FIGURE 12.1). 3. Position the battery so that the terminals are above the horizontal centerline. 4. Visually inspect the battery to ensure the correct position of the POSITIVE and NEGATIVE terminals (FIGURE 12.1). Part No. 1106645 51 R51™and R51LXP
-
 1
1 -
2
-
3
-
4
-
5
-
6
-
7
-
8
-
9
-
10
-
11
-
12
-
13
-
14
-
15
-
16
-
17
-
18
-
19
-
20
-
21
-
22
-
23
-
24
-
25
-
26
-
27
-
28
-
29
-
30
-
31
-
32
-
33
-
34
-
35
-
36
-
37
-
38
-
39
-
40
-
41
-
42
-
43
-
44
-
45
-
 46
46 -
 47
47 -
 48
48 -
 49
49 -
 50
50 -
 51
51 -
 52
52 -
 53
53 -
 54
54 -
 55
55 -
 56
56 -
57
-
58
-
59
-
60
-
61
-
62
-
63
-
64
-
65
-
66
-
67
-
68
-
69
-
70
-
71
-
72
-
73
-
74
-
75
-
76
 |
 |
