Invacare TRSX5RC Owners Manual - Page 42
Seat and Back
 |
View all Invacare TRSX5RC manuals
Add to My Manuals
Save this manual to your list of manuals |
Page 42 highlights
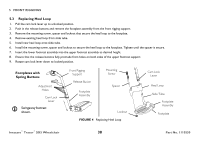
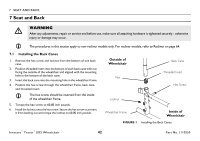
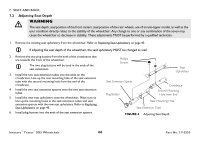
7 SEAT AND BACK 7 Seat and Back ƽ WARNING After any adjustments, repair or service and before use, make sure all attaching hardware is tightened securely - otherwise injury or damage may occur. The procedures in this section apply to non-recliner models only. For recliner models, refer to Recliner on page 64. 7.1 Installing the Back Canes 1. Remove the hex screw and locknut from the bottom of one back cane. 2. Position threaded insert into the bottom of each back cane with nut facing the outside of the wheelchair and aligned with the mounting hole in the bottom of the back cane. 3. Insert the back cane into the mounting hole in the wheelchair frame. 4. Position the hex screw through the wheelchair frame, back cane, and threaded insert. The hex screw should be inserted from the inside of the wheelchair frame. 5. Torque the hex screw to 60-80 inch pounds. 6. Install the locknut onto the hex screw. Secure the hex screw to prevent it from backing out and torque the locknut to 60-80 inch pounds. Outside of Wheelchair Nut Back Cane Threaded Insert Hex Screw Locknut Wheelchair Frame Inside of Wheelchair FIGURE 1 Installing the Back Canes Invacare® Tracer® SX5 Wheelchair 42 Part No. 1110550
-
 1
1 -
2
-
3
-
4
-
5
-
6
-
7
-
8
-
9
-
10
-
11
-
12
-
13
-
14
-
15
-
16
-
17
-
18
-
19
-
20
-
21
-
22
-
23
-
24
-
25
-
26
-
27
-
28
-
29
-
30
-
31
-
32
-
33
-
34
-
35
-
36
-
 37
37 -
 38
38 -
 39
39 -
 40
40 -
 41
41 -
 42
42 -
 43
43 -
 44
44 -
 45
45 -
 46
46 -
 47
47 -
48
-
49
-
50
-
51
-
52
-
53
-
54
-
55
-
56
-
57
-
58
-
59
-
60
-
61
-
62
-
63
-
64
-
65
-
66
-
67
-
68
-
69
-
70
-
71
-
72
-
73
-
74
-
75
-
76
-
77
-
78
-
79
-
80
 |
 |