JBL 305P MkII 3 Series MkII Owners Manual - English - Page 11
Input Panel, Audio Connections, XLR INPUT, INPUT SENSITIVITY SWITCH, BOUNDARY EQ SWITCH
 |
View all JBL 305P MkII manuals
Add to My Manuals
Save this manual to your list of manuals |
Page 11 highlights
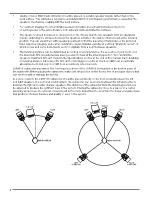
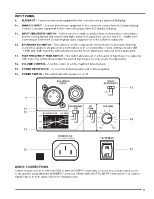
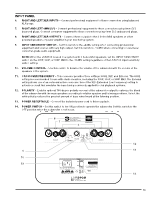
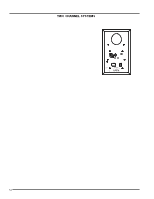
INPUT PANEL 9. XLR INPUT - Connect professional equipment to this connector using a balanced XLR plug. 10. 6MM (¼") INPUT - Connect professional equipment to this connector using a 6mm (¼") balanced plug. Connect consumer equipment to this connector using a 6mm (¼") unbalanced plug. 11. INPUT SENSITIVITY SWITCH - Set this switch to +4dBu to protect from overload when connecting to professional equipment and sources with high output level capabilities. Set this switch to -10dBV when connecting to lower-level consumer-grade audio equipment or to the LSR310S subwoofer. 12. BOUNDARY EQ SWITCH - This switch is used to compensate for low frequency anomalies that may occur when speakers are placed on a work surface or in close proximity to walls. Settings include 0dB, -1.5dB, and -3dB. Select the setting that provides the most natural bass response for the application. 13. HIGH FREQUENCY TRIM SWITCH - This switch allows boost or attenuation of high frequency output by 2dB. Select the setting that provides the desired high frequency response for the application. 14. VOLUME CONTROL - Use this control to set the maximum listening level. 15. POWER RECEPTACLE - Connect the included power cord to this receptacle. 16. POWER SWITCH - This switch turns the speaker on or off. 11 9 10 12 14 13 15 16 AUDIO CONNECTIONS Connect signal sources to either the XLR or 6mm (¼") INPUT connectors. Connect only a single signal source to the speaker using either the XLR INPUT connector, OR the 6mm (¼") TRS INPUT connector. Do not connect signal sources to both input connectors simultaneously. 11
-
 1
1 -
2
-
3
-
4
-
5
-
 6
6 -
 7
7 -
 8
8 -
 9
9 -
 10
10 -
 11
11 -
 12
12 -
 13
13 -
 14
14 -
 15
15 -
 16
16 -
17
-
18
-
19
-
20
-
21
-
22
 |
 |
