JET Tools JAT-202 User Manual - Page 7
Setup and Assembly, Operation
 |
View all JET Tools JAT-202 manuals
Add to My Manuals
Save this manual to your list of manuals |
Page 7 highlights
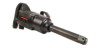
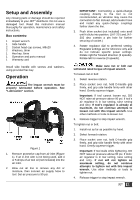
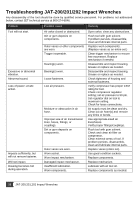
Setup and Assembly Any missing parts or damage should be reported immediately to your JET® distributor. Do not use a damaged tool. Read this instruction manual thoroughly for operation, maintenance and safety instructions. Box contents: 1 Impact wrench 1 Side handle 2 Socket head cap screws, M8x20 2 Washers, 8mm 1 Hex key, 6mm 1 Operation and parts manual 1 Warranty card Install side handle with screws and washers, using provided hex key. Operation The impact wrench must be properly lubricated before operation. See "Lubrication" section. Figure 1 1. Remove protective cap from air inlet (Figure 1). If an in-line oiler is not being used, add 4 or 5 drops of air tool oil (not included) into the air inlet. 2. Blow out air line to remove any dirt or moisture, then connect air supply hose to tool. Set air pressure to 90 psi. IMPORTANT: Connecting a quick-change coupling directly to the tool is not recommended, as vibration may cause the connection to fail. Instead, add a leader hose and install any quick-change couplings farther down the line. 3. Push drive socket (not included) onto anvil until it clicks into position. (JAT-201 and JAT202 also contain a pin hole for further securing of socket.) 4. Rotate regulator dial to preferred setting. Regulator settings are for reference only and do not indicate specific power settings. Rotate right for forward direction (3 speeds). Rotate left for reverse (3 speeds). Make sure nut or bolt can withstand rated torque of impact wrench. To loosen nut or bolt: 1. Select reverse rotation. 2. Place socket over nut, hold D-handle grip firmly, and grip side handle firmly with other hand. Gently squeeze trigger. Important: If tool cannot loosen nut, DO NOT raise air pressure above 90 psi. If tool's air regulator is in low setting, raise setting and retry. If tool's regulator is already at maximum, do not continue attempts to loosen nut with this impact wrench. Use other methods or tools to loosen nut. 3. Release trigger to stop impact wrench. To tighten nut or bolt: 1. Install nut as far as possible by hand. 2. Select forward rotation. 3. Place socket over nut, hold D-handle grip firmly, and grip side handle firmly with other hand. Gently squeeze trigger. Important: If tool stalls while tightening, DO NOT raise air pressure above 90 psi. If tools' air regulator is in low setting, raise setting and retry. If nut will not tighten on maximum setting, do not continue attempts to tighten nut with this impact wrench. Use other methods or tools to tighten nut. 4. Release trigger to stop impact wrench. JET 7
-
 1
1 -
 2
2 -
 3
3 -
 4
4 -
 5
5 -
 6
6 -
 7
7 -
 8
8 -
 9
9 -
 10
10 -
 11
11 -
 12
12 -
13
-
14
-
15
-
16
-
17
-
18
-
19
-
20
 |
 |
