JVC CW-DRA8 Operation Manual - Page 6
Installation
 |
View all JVC CW-DRA8 manuals
Add to My Manuals
Save this manual to your list of manuals |
Page 6 highlights
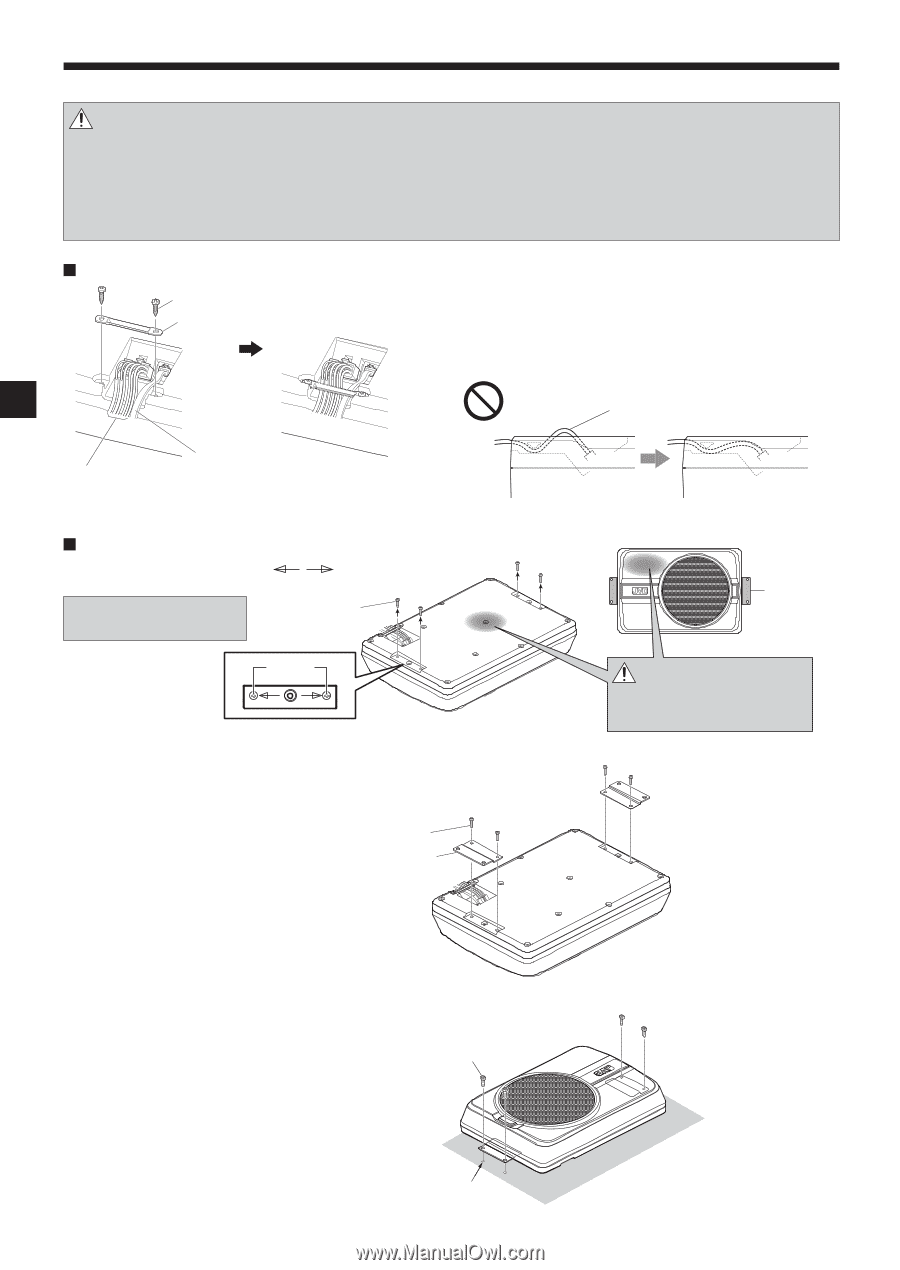
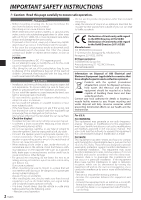
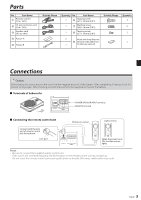
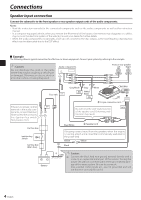
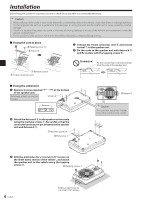
Installation Before fixing the speaker in its position, be sure to check the sound while it is connected preliminary. Caution: • When making a hole under a seat, inside the trunk, or somewhere else in the vehicle, check that there is nothing hazardous on the opposite side such as a gasoline tank, brake pipe; or wiring harness, and be careful not to cause scratches or other damage. • Install in a location that does not come in the way of driving, getting in or out of the vehicle and movement inside the vehicle compartment. • Fix the product firmly so that it will not be moved by vibrations or impacts during driving. Fixing the cord in place ᶊ Tapping screw x 2 ᶇ Fixture B ⁞ Connect the 10-pin connector cord ᶄ and remote control ᶃ to the speaker unit. Fix the cords to the speaker unit with fixture B ᶇ and fix in place with the tapping screws ᶊ. ᶃ Remote control ᶄ 10-pin connector cord Prohibition! Fix the cord so that it will not protrude from the side of the speaker unit. Fixing the subwoofer ⁞ Remove 4 screws (marked of the speaker unit. Removed screws can not be reused. ) at the bottom Screw x 4 Remove Attach the fixtures A ᶆ to the speaker unit securely using the machine screws ᶉ. Be careful so that the connected cords do not get in between the speaker unit and fixtures A ᶆ. ᶉ Machine screw x 4 ᶆ Fixture A x 2 ᶆ Fixture A Caution: This portion becomes hotter than other portions. Be careful. Drill the pilot holes for ø 3.6 mm (1/8") screws on the sheet metal section of the vehicle , and attach the speaker unit to the vehicle using the tapping screws ᶈ. ᶈ Tapping screw x 4 6 English Drill four pilot holes for ø 3.6 mm (1/8") screws.
-
 1
1 -
 2
2 -
 3
3 -
 4
4 -
 5
5 -
 6
6 -
 7
7 -
 8
8 -
 9
9 -
 10
10 -
 11
11 -
 12
12 -
13
-
14
-
15
-
16
-
17
-
18
-
19
-
20
-
21
-
22
-
23
-
24
-
25
-
26
-
27
-
28
-
29
-
30
-
31
-
32
-
33
-
34
-
35
-
36
-
37
-
38
-
39
-
40
-
41
-
42
-
43
-
44
-
45
-
46
-
47
-
48
-
49
-
50
-
51
-
52
-
53
-
54
-
55
-
56
-
57
-
58
-
59
-
60
-
61
-
62
-
63
-
64
-
65
-
66
-
67
-
68
-
69
-
70
-
71
-
72
-
73
-
74
-
75
-
76
-
77
-
78
-
79
-
80
 |
 |