JVC D347US Instruction Manual - Page 17
Basic Recording, Tape Remaining Time
 |
UPC - 046838026928
View all JVC D347US manuals
Add to My Manuals
Save this manual to your list of manuals |
Page 17 highlights
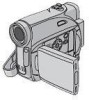
Basic Recording NOTE: Before continuing, perform the procedures listed below: ● Power (੬ pg. 11) ● Loading A Cassette (੬ pg. 16) Zoom Lever POWER/CHARGE Lamp VIDEO RECORDING EN 17 Tape Remaining Time Approximate tape remaining time appears on the display. "---min" means the camcorder is calculating the remaining time. When the remaining time reaches 2 minutes, the indication starts blinking. ● The time required to calculate and display the remaining tape length, and the accuracy of the calculation, may vary according to the type of tape used. Lock Button Recording Start/Stop Button VIDEO RECORDING & PLAYBACK 1 Remove the lens cap. (੬ pg. 11) 2 Open the LCD monitor fully. 3 Set the Power Switch to "REC" while pressing down the Lock Button located on the switch. ● The POWER/CHARGE lamp lights and the camcorder enters the Record-Standby mode. " PAUSE" is displayed. ● To record in LP (Long Play) mode, ੬ pg. 23. 4 To start recording, press the Recording Start/ Stop Button. " REC" appears on the display while recording is in progress. 5 To stop recording, press the Recording Start/ Stop Button again. The camcorder re-enters the Record-Standby mode. Approximate recording time Tape 30 min. 60 min. 80 min. Recording mode SP LP 30 min. 45 min. 60 min. 90 min. 80 min. 120 min. NOTES: ● If the Record-Standby mode continues for 5 minutes and no operation is performed (" PAUSE" indicator may not appear), the camcorder's power shuts off automatically. To turn the camcorder on again, push back and pull out the viewfinder again or close and re-open the LCD monitor. ● When a blank portion is left between recorded scenes on the tape, the time code is interrupted and errors may occur when editing the tape. To avoid this, refer to "Recording From The Middle Of A Tape" (੬ pg. 19). ● To turn the melody sounds off, ੬ pg. 22, 24.
-
 1
1 -
2
-
3
-
4
-
5
-
6
-
7
-
8
-
9
-
10
-
11
-
 12
12 -
 13
13 -
 14
14 -
 15
15 -
 16
16 -
 17
17 -
 18
18 -
 19
19 -
 20
20 -
 21
21 -
 22
22 -
23
-
24
-
25
-
26
-
27
-
28
-
29
-
30
-
31
-
32
-
33
-
34
-
35
-
36
-
37
-
38
-
39
-
40
-
41
-
42
-
43
-
44
-
45
-
46
-
47
-
48
-
49
-
50
-
51
-
52
-
53
-
54
-
55
-
56
-
57
-
58
-
59
-
60
-
61
-
62
-
63
-
64
-
65
-
66
-
67
-
68
-
69
-
70
-
71
-
72
-
73
-
74
-
75
-
76
-
77
-
78
-
79
-
80
-
81
-
82
-
83
-
84
-
85
-
86
-
87
-
88
 |
 |
