JVC DLA-HD10KU DLA-HD10K Owner's Manual (50 pages) - Page 15
Indicator Display, Indicator Display on the Top Surface
 |
View all JVC DLA-HD10KU manuals
Add to My Manuals
Save this manual to your list of manuals |
Page 15 highlights
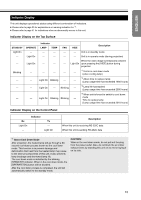
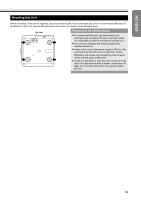
ENGLISH Indicator Display This unit displays operational states using different combination of indicators. ● Please refer to page 35 for explanations on warning indication for *2. ● Please refer to page 41 for indications when an abnormality occurs in this unit. Indicator Display on the Top Surface STAND BY Light On ^ ^ Blinking ^ ^ ^ OPERATE ^ Light On Light On ^ ^ ^ ^ Indicator LAMP TEMP FAN HIDE Description ^ ^ ^ ^ Unit is in standby mode ^ ^ ^ ^ Unit is in operate mode (during projection) When the video image is temporarily cleared ^ ^ ^ Light On upon pressing the [HIDE] button during projection ^ ^ ^ ^ *1 Unit is in cool down mode (when cooling lamp) Light On Blinking ^ ^ *2 About time to replace lamp (Lamp usage time has exceeded 1900 hours) Light On ^ Blinking ^ *2 Lamp life has expired (Lamp usage time has exceeded 2000 hours) *2 When unit is forced to switch to cool down Light On Blinking Blinking ^ mode Time to replace lamp (Lamp usage time has exceeded 2010 hours) Indicator Display on the Control Panel Rx Light On ^ Indicator Tx ^ Light On Description When this unit is receiving RS-232C data When this unit is sending RS-232C data *1 About Cool Down Mode After projection, the heated lamp will go through a 60second cool-down process known as the cool down mode. This function is to prevent damage and deformation that heat from the heated lamp may cause to the internal components of this unit. It also prevents lamp breakage and shortened lamp life. The cool down mode is indicated by the blinking [STAND BY] indicator. When in the cool down mode, the [OPERATE ON] button will be disabled. After the cool down process is completed, the unit will automatically switch to the standby mode. CAUTION: When in the cool down mode, do not pull out the plug from the power outlet. Also, do not block the air inlets/ exhaust vents by standing this unit on its end or laying it on its side. 15
-
 1
1 -
2
-
3
-
4
-
5
-
6
-
7
-
8
-
9
-
 10
10 -
 11
11 -
 12
12 -
 13
13 -
 14
14 -
 15
15 -
 16
16 -
 17
17 -
 18
18 -
 19
19 -
 20
20 -
21
-
22
-
23
-
24
-
25
-
26
-
27
-
28
-
29
-
30
-
31
-
32
-
33
-
34
-
35
-
36
-
37
-
38
-
39
-
40
-
41
-
42
-
43
-
44
-
45
-
46
-
47
-
48
-
49
-
50
 |
 |
