JVC DLA-HD10KU DLA-HD10K Owner's Manual (50 pages) - Page 37
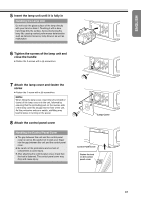
Tighten the screws of the lamp unit and, close the handle
 |
View all JVC DLA-HD10KU manuals
Add to My Manuals
Save this manual to your list of manuals |
Page 37 highlights
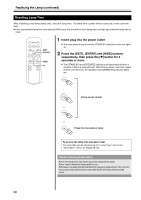
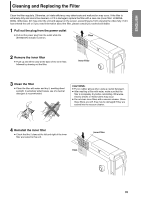
ENGLISH e Insert the lamp unit until it is fully in Handling the Lamp Unit Do not touch the glass surface of the lamp directly with your hand or stain it. Touching it with a bare hand may dirty the surface, hence shortening the lamp life, causing marked performance deterioration such as darkened screens, lamp blowout as well as malfunction. f Tighten the screws of the lamp unit and close the handle ● Fasten the 2 screws with a F screwdriver. g Attach the lamp cover and fasten the screw ● Fasten the 1 screw with a F screwdriver. NOTE: When fitting the lamp cover, insert the left end (with 2 claws) of the lamp cover into the unit, followed by ensuring that the protruding part on the reverse side of the lamp cover fits snugly into the hole of the unit. As this protrusion acts as a switch, misfitting may lead to failure in turning on the power. h Attach the control panel cover Handling the Control Panel Cover ● The gap between this unit and the control panel cover is narrow. Be careful not to stick your finger into the gap between this unit and the control panel cover. ● Be careful of the protrusions and corners of components to avoid injury. ● After attaching the control panel cover, check that the lock is fastened. The control panel cover may drop and cause injury. Lamp Cover Control Panel Cover Fasten the lock on the control panel cover 37
-
 1
1 -
2
-
3
-
4
-
5
-
6
-
7
-
8
-
9
-
10
-
11
-
12
-
13
-
14
-
15
-
16
-
17
-
18
-
19
-
20
-
21
-
22
-
23
-
24
-
25
-
26
-
27
-
28
-
29
-
30
-
31
-
 32
32 -
 33
33 -
 34
34 -
 35
35 -
 36
36 -
 37
37 -
 38
38 -
 39
39 -
 40
40 -
 41
41 -
 42
42 -
43
-
44
-
45
-
46
-
47
-
48
-
49
-
50
 |
 |
