JVC DLA-HX1U Instruction Manual - Page 13
DIGITAL ZOOM], HIDE] button
 |
View all JVC DLA-HX1U manuals
Add to My Manuals
Save this manual to your list of manuals |
Page 13 highlights
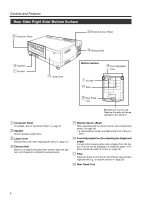
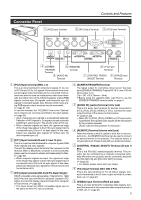
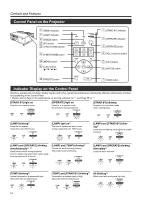
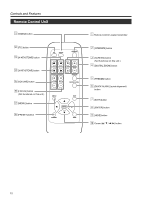
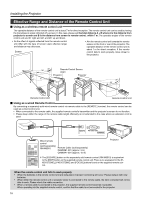
Controls and Features 1 Remote Control's signal transmitter (☞ page 18) 2 [OPERATE] button When the projector is in standby mode, pressing this button for one second or more will turn on the projector and light up the [OPERATE] indicator. Press it one second or more again and the projector will turn off, cool down and finally enter the standby mode. (☞ page 25) • The [OPERATE] button will not work for approximately 1 minute from when the light-source lamp is turned on. Wait approximately 1 minute before pressing. 3 [SCREEN] „ / Í button Not functional on this unit. 4 [DIGITAL ZOOM] ª / · buttons This digital zoom function can magnify the image by up to four times on the screen. (☞ page 28) • There will however be some inevitable loss of image qual- ity when images are enlarged. 5 [FREEZE] button This button allows the image to be retained in the projector memory and stills the picture on the screen. Press the button once to freeze the picture and again to de-freeze. (☞ page 29) 6 [QUICK ALIGN.] (quick alignment) button Use this button to automatically adjust the projected image's (i)horizontal and vertical position, (ii) Width and display area, etc. During alignment, the message "QUICK ALIGN..." appears on the screen and disappears when alignment is complete. (☞ page 31) • The Quick Alignment function only works when the sig- nal is input from either the [PC1] or [PC2] terminal. It does not work when the signal is input from the [VIDEO] input terminal or the [Y/C] input terminal. • When input signal from [PC3] input terminal is received, "QUICK ALIGN..." is displayed but it is not functional. 7 [EXIT] button Press this button to display the previous hierarchical menu (For example, from sub-menu to main menu). When the main menu is displayed, pressing this button will cause the menu to disappear. (☞ page 35) 8 [ENTER] button Press this button to show the next hierarchical menu (For example, from main menu to sub menu). It is also used when [ENTER] is displayed against the item on the menu screen or to select the "Reset" menu. (☞ page 35) 9 [HIDE] button Use this button to temporarily halt the audio and visual output. Press again to resume. (☞ page 29) p Cursor button These buttons are used in the menu mode to select an item, adjust the value etc. (☞ page 35) q [VIDEO] button Use this button to select a device such as a video connected to the [VIDEO IN] terminal ([VIDEO] or [Y/C] Input terminal) of the projector. (☞ page 25) w [PC] button Use this button to select a device connected to the [PC1], [PC2] or [PC3] terminal of the projector. (☞ page 26) e [H-KEYSTONE] button Use this button to remove the horizontal trapezoidal distortion of the image projected on the screen. (☞ page 30) r [V-KEYSTONE] button Use this button to remove the vertical trapezoidal distortion of the image projected on the screen. (☞ page 30) t [VOLUME] ª / · button Use these buttons to adjust the sound volume. (☞ page 27) y [FOCUS] ª / · button Not functional on this unit. u [MENU] button Use this button to enter or exit the menu mode. When the main menu is displayed, press this button and it will disappear. (☞ page 35) i [PRESET] button This [PRESET] button only works as a reset button for the [VOL.], [V-KEYSTONE] and [H-KEYSTONE] adjustments done on the control panel and the [VOLUME], [V-KEYSTONE], [H-KEYSTONE] and [DIGITAL ZOOM] adjustments done on the remote control. (☞ page 28, 30) When adjusting the volume, keystone or digital zoom (when the setting is displayed on the screen) the adjusted value is reset to that which was set when the projector was shipped from the factory. This button does not work for the menu (submenu) items. 13
-
 1
1 -
2
-
3
-
4
-
5
-
6
-
7
-
 8
8 -
 9
9 -
 10
10 -
 11
11 -
 12
12 -
 13
13 -
 14
14 -
 15
15 -
 16
16 -
 17
17 -
 18
18 -
19
-
20
-
21
-
22
-
23
-
24
-
25
-
26
-
27
-
28
-
29
-
30
-
31
-
32
-
33
-
34
-
35
-
36
-
37
-
38
-
39
-
40
-
41
-
42
-
43
-
44
-
45
-
46
-
47
-
48
-
49
-
50
-
51
-
52
-
53
-
54
-
55
-
56
-
57
-
58
-
59
-
60
-
61
-
62
 |
 |
