JVC DLA-HX1U Instruction Manual - Page 6

Contents, Accessories - troubleshooting

Page 6 highlights

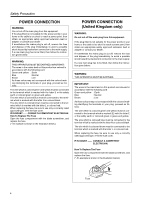
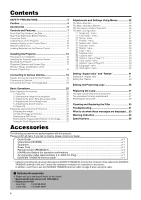
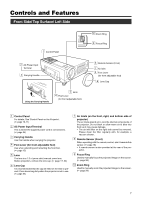
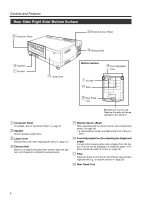
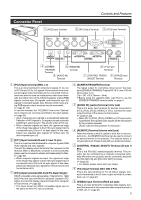
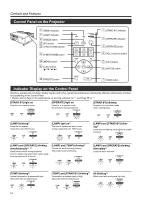
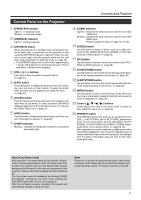
Contents SAFETY PRECAUTIONS 2 Caution 5 Accessories 6 Controls and Features 7 Front Side/ Top Surface/ Left Side 7 Rear Side/ Right Side/ Bottom Surface 8 Connector Panel 9 Control Panel on the Projector 10 Indicator Display on the Control Panel 10 Remote Control Unit 12 Loading Batteries into the Remote Control 14 Installing the Projector 15 Precautions for Installation 15 Installing the Projector against the Screen 16 Mounting the Projector 16 Projection Distance and Screen Size 17 Effective Range and Distance of the Remote Control Unit 18 Connecting to Various Devices 19 Signals that can be input into the Projector 19 Connecting to Devices 21 Connecting the Power Cord (supplied 24 Basic Operations 25 Basic Operation Procedures 25 1. Power On 25 2. Selecting the image to be projected 25 3. Adjusting the Zoom Ring (the screen size 26 4. Adjusting the Focus Ring(Focus 26 5. Adjusting the Sound Volume 27 6. Power Off 27 Frequently used Convenient Functions 28 Enlarging the Image 28 Turning Off Image and Sound 29 Displaying a Still Picture 29 Removing the Trapezoidal Distortion of the Image ......... 30 Using the Quick Alignment function 31 Accessories Adjustments and Settings Using Menus 32 The Menu Structure 32 The Menu Operation Buttons 35 The Procedure for Menu Operation 36 The Menu Configuration 37 1 "Image adj." menu 37 2 "Color temp." menu 37 3 "Set up" menu 37 4 "Position" menu 38 5 "Aspect ratio" menu 38 6 "Decoder" menu 38 7 "Resize" menu 38 8 "Logo" menu 38 9 "Capture menu 38 p "Capture start 39 q "Options" menu ("Page 1 39 w "Color profile" menu 39 e "Options" menu ("Page 2 39 r "Language" menu 39 t "Information" menu 40 Setting "Aspect ratio" and "Resize 41 Setting the "Aspect ratio 41 Setting the "Resize 43 Editing and Projecting Logo 45 Replacing the Lamp 47 The light source lamp and its lamp time 47 The procedure for lamp replacement 47 Resetting the lamp time 49 Cleaning and Replacing the Filter 50 Troubleshooting 51 What to do when these messages are displayed .... 53 Warning Indication 55 Specifications 56 The following accessories are packed together with this projector. Please confirm all items. If any item is missing, please contact your dealer. Quick Guide ...x 1 Instructions (CD-ROM) ...x 1 Guarantee ...x 1 Power Cord ...x 1 Remote Control (RM-MSX21) ...x 1 [AA/R6]-size Battery (for operation confirmation x 2 AV connection cable (approximately 2 m: RCA Pin Plug x 1 [SCREEN TRIGGER] terminal cable x 1 * Cable for controlling roll-up screen that supports [SCREEN TRIGGER]. Connect the connector of the cable to the [SCREEN TRIGGER] terminal of this unit. Consult the installation contractor for connection to the screen. In addition, read 'How to use the [SCREEN TRIGGER] terminal cable' on page 5 when using the cable. Ⅵ Optional Accessories ❈ Please ask your authorized dealer for the details. • Replacement lamp (lamp unit) BHL5006-S • Replacement filter Inner filter : LC32058-002A Lower filter : LC32087-002A 6

  • 1
  • 2
  • 3
  • 4
  • 5
  • 6
  • 7
  • 8
  • 9
  • 10
  • 11
  • 12
  • 13
  • 14
  • 15
  • 16
  • 17
  • 18
  • 19
  • 20
  • 21
  • 22
  • 23
  • 24
  • 25
  • 26
  • 27
  • 28
  • 29
  • 30
  • 31
  • 32
  • 33
  • 34
  • 35
  • 36
  • 37
  • 38
  • 39
  • 40
  • 41
  • 42
  • 43
  • 44
  • 45
  • 46
  • 47
  • 48
  • 49
  • 50
  • 51
  • 52
  • 53
  • 54
  • 55
  • 56
  • 57
  • 58
  • 59
  • 60
  • 61
  • 62

6
Contents
Accessories
The following accessories are packed together with this projector.
Please confirm all items. If any item is missing, please contact your dealer.
Quick Guide
........................................................................................................................................
x 1
Instructions (CD-ROM)
.......................................................................................................................
x 1
Guarantee
...........................................................................................................................................
x 1
Power Cord
.........................................................................................................................................
x 1
Remote Control (RM-MSX21)
.............................................................................................................
x 1
[AA/R6]-size Battery (for operation confirmation)
...............................................................................
x 2
AV connection cable (approximately 2 m: RCA Pin Plug)
...................................................................
x 1
[SCREEN TRIGGER] terminal cable*
.................................................................................................
x 1
SAFETY PRECAUTIONS
............................................
2
Caution
........................................................................
5
Accessories
................................................................
6
Controls and Features
...............................................
7
Front Side/ Top Surface/ Left Side
.........................................
7
Rear Side/ Right Side/ Bottom Surface
..................................
8
Connector Panel
....................................................................
9
Control Panel on the Projector
.............................................
10
Indicator Display on the Control Panel
................................
10
Remote Control Unit
.............................................................
12
Loading Batteries into the Remote Control
..........................
14
Installing the Projector
............................................
15
Precautions for Installation
...................................................
15
Installing the Projector against the Screen
..........................
16
Mounting the Projector
.........................................................
16
Projection Distance and Screen Size
...................................
17
Effective Range and Distance of the
Remote Control Unit
.............................................................
18
Connecting to Various Devices
...............................
19
Signals that can be input into the Projector
.........................
19
Connecting to Devices
.........................................................
21
Connecting the Power Cord (supplied)
...............................
24
Basic Operations
......................................................
25
Basic Operation Procedures
................................................
25
1. Power On
....................................................................
25
2. Selecting the image to be projected
..........................
25
3. Adjusting the Zoom Ring (the screen size)
................
26
4. Adjusting the Focus Ring(Focus)
...............................
26
5. Adjusting the Sound Volume
.......................................
27
6. Power Off
....................................................................
27
Frequently used Convenient Functions
...............................
28
Enlarging the Image
.......................................................
28
Turning Off Image and Sound
.........................................
29
Displaying a Still Picture
.................................................
29
Removing the Trapezoidal Distortion of the Image
.........
30
Using the Quick Alignment function
...............................
31
Adjustments and Settings Using Menus
...............
32
The Menu Structure
..............................................................
32
The Menu Operation Buttons
...............................................
35
The Procedure for Menu Operation
.....................................
36
The Menu Configuration
.......................................................
37
1
“Image adj.” menu
......................................................
37
2
“Color temp.” menu
....................................................
37
3
“Set up” menu
............................................................
37
4
“Position” menu
..........................................................
38
5
“Aspect ratio” menu
...................................................
38
6
“Decoder” menu
.........................................................
38
7
“Resize” menu
............................................................
38
8
“Logo” menu
...............................................................
38
9
“Capture menu”
..........................................................
38
p
“Capture start”
............................................................
39
q
“Options” menu (“Page 1”)
.........................................
39
w
“Color profile” menu
...................................................
39
e
“Options” menu (“Page 2”)
.........................................
39
r
“Language” menu
......................................................
39
t
“Information” menu
.....................................................
40
Setting “Aspect ratio” and “Resize”
.......................
41
Setting the “Aspect ratio”
.....................................................
41
Setting the “Resize”
.............................................................
43
Editing and Projecting Logo
...................................
45
Replacing the Lamp
.................................................
47
The light source lamp and its lamp time
..............................
47
The procedure for lamp replacement
..................................
47
Resetting the lamp time
.......................................................
49
Cleaning and Replacing the Filter
..........................
50
Troubleshooting
.......................................................
51
What to do when these messages are displayed
....
53
Warning Indication
...................................................
55
Specifications
...........................................................
56
*
Cable for controlling roll-up screen that supports [SCREEN TRIGGER]. Connect the connector of the cable to the [SCREEN
TRIGGER] terminal of this unit. Consult the installation contractor for connection to the screen.
In addition, read ‘How to use the [SCREEN TRIGGER] terminal cable’ on page 5 when using the cable.
±
Optional Accessories
Please ask your authorized dealer for the details.
Replacement lamp (lamp unit)
BHL5006-S
Replacement filter
Inner filter
: LC32058-002A
Lower filter
: LC32087-002A