JVC DLA-X70R Instructions - Page 28
Connection to the unit
 |
View all JVC DLA-X70R manuals
Add to My Manuals
Save this manual to your list of manuals |
Page 28 highlights
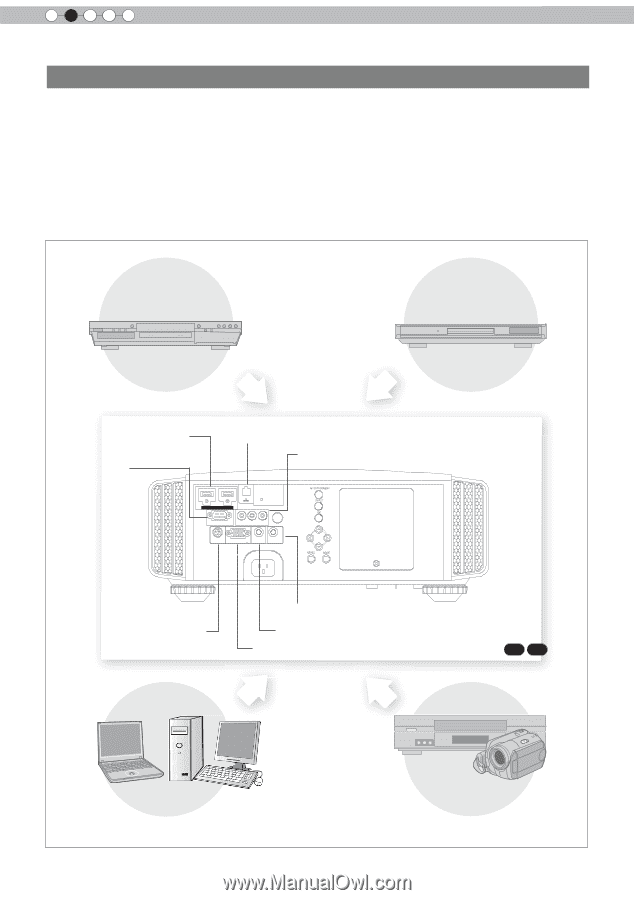
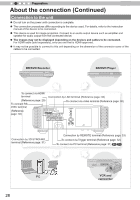
2 Preparation About the connection (Continued) Connection to the unit ● Do not turn on the power until connection is complete. ● The connection procedures differ according to the device used. For details, refer to the instruction manual of the device to be connected. ● This device is used for image projection. Connect to an audio output device such as amplifier and speaker for audio output from the connected device. ● The images may not be displayed depending on the devices and cables to be connected. For HDMI cable (sold separately), only use one that is HDMI-approved. ● It may not be possible to connect to this unit depending on the dimension of the connector cover of the cables to be connected. BD/DVD Recorder BD/DVD Player To connect via HDMI terminal Connection by LAN terminal (Reference page: 33) (Reference page: 29) To connect RS- To connect via video terminal (Reference page: 30) 232C terminal STANDBY/ON (Reference page: 32) 1 HDMI 2 RS-232-C CR/PR CB/PB Y INPUT OK 3D SYNCHRO PC TRIGGER REMOTE CONTROL MENU BACK Connection by 3D SYNCHRO terminal (Reference page: 31) Connection by REMOTE terminal (Reference page: 33) To connect via Trigger terminal (Reference page: 32) To connect via PC terminal (Reference page: 31) 90 70 PC 28 VCR and camcorder
-
 1
1 -
2
-
3
-
4
-
5
-
6
-
7
-
8
-
9
-
10
-
11
-
12
-
13
-
14
-
15
-
16
-
17
-
18
-
19
-
20
-
21
-
22
-
 23
23 -
 24
24 -
 25
25 -
 26
26 -
 27
27 -
 28
28 -
 29
29 -
 30
30 -
 31
31 -
 32
32 -
 33
33 -
34
-
35
-
36
-
37
-
38
-
39
-
40
-
41
-
42
-
43
-
44
-
45
-
46
-
47
-
48
-
49
-
50
-
51
-
52
-
53
-
54
-
55
-
56
-
57
-
58
-
59
-
60
-
61
-
62
-
63
-
64
-
65
-
66
-
67
-
68
-
69
-
70
-
71
-
72
-
73
-
74
-
75
-
76
-
77
-
78
-
79
-
80
-
81
-
82
-
83
-
84
-
85
-
86
-
87
-
88
-
89
-
90
-
91
-
92
-
93
-
94
-
95
-
96
 |
 |