JVC GM-V42UG Instructions - Page 11
Installation - stand
 |
View all JVC GM-V42UG manuals
Add to My Manuals
Save this manual to your list of manuals |
Page 11 highlights
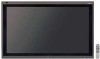
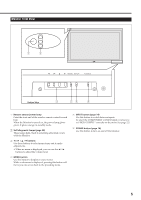
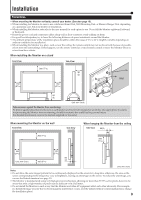
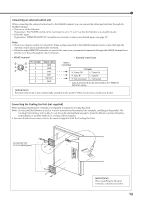
Installation Precautions • When mounting the Monitor vertically, consult your dealer. (See also page 13). • When installing the Monitor, be sure to use a dedicated Stand Unit, Wall Mounting Unit, or Monitor Hanger Unit, depending on a particular case. Ask your dealer for installation. • When installing the Monitor, refer also to the user manual for each option to use. Do not tilt the Monitor rightward, leftward, or backward. • Route the power cord and connection cables along wall or floor corners to avoid walking on them. • For good heat dissipation, try to leave the following distances of space (minimum) around the Monitor. • The ambient temperature of the installation place should be within the range of 0˚C to 40˚C (slightly variable depending on ambient conditions for installation.) • When installing the Monitor in a place, such as near the ceiling, the remote control may not work correctly because of possible effects from the surroundings. If this happens, use the remote control as a wired remote control or move the Monitor where it is free from these effects. When installing the Monitor on a stand Front View Side View 150 (415/16 ) 200 (77/8) 50 (2) 150 (415/16 ) Wall MENU INPUT POWER 50 (2) Unit: mm (inch) Take measures against the Monitor from overturning: To protect against abnormal events such as earthquakes and to prevent unexpected accidents, take appropriate measures for preventing the Monitor from overturning; should it overturn, this could lead to personal injury. For detailed information, refer to the manual supplied for the stand. When mounting the Monitor on the wall Front View 200 (77/8) Side View When hanging the Monitor from the ceiling Side View 50(2) 200 (7 7 /8) 100 (3 15/16) Unit: mm (inch) 100 (3 15/16) 100 (3 15/16) MENU INPUT POWER 50 (2) Unit: mm (inch) Notes: • Do not allow the same image (pattern) to be continuously displayed on the screen for a long time; otherwise, the area on the screen corresponding to the image may vary in brightness, leaving an afterimage on the screen. To reduce the afterimage, you can use the Refresh function (see page 31). • The Monitor is manufactured using very high-precision technology, allowing for more than 99.99% active pixels, however, be aware that only a slight number of pixels may be deficient or lit at all times. • Do not install the Monitor in such a way that the Monitor and other AV equipment affect each other adversely. (For example, if a disturbed image or noise due to electromagnetic interference occurs, or if the infrared remote control malfunctions, change the installation place.) 9
-
 1
1 -
2
-
3
-
4
-
5
-
 6
6 -
 7
7 -
 8
8 -
 9
9 -
 10
10 -
 11
11 -
 12
12 -
 13
13 -
 14
14 -
 15
15 -
 16
16 -
17
-
18
-
19
-
20
-
21
-
22
-
23
-
24
-
25
-
26
-
27
-
28
-
29
-
30
-
31
-
32
-
33
-
34
-
35
-
36
-
37
-
38
-
39
-
40
-
41
-
42
-
43
-
44
 |
 |