JVC GM-V42UG Instructions - Page 29
Setting the High-Definition Signal Types, Setting the Remote-Controllable Input
 |
View all JVC GM-V42UG manuals
Add to My Manuals
Save this manual to your list of manuals |
Page 29 highlights
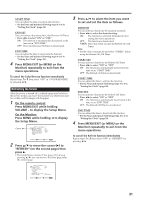
Setting the Remote-Controllable Input When connecting the external control unit to the REMOTE MAKE terminal, you need to set the desired input to use, which you can select from the connected external control unit. 1 On the remote control: Press MENU/EXIT while holding VOLUME - to display the Setup Menu. On the Monitor: Press MENU while holding 2 to display the Setup Menu. Cursor (3) SET-UP MENU STATUS DISPLAY CONTROL LOCK REMOTE SWITCH HD SIGNAL MODE WHITE BALANCE TIMER 1/2 : OFF : OFF : MODE1 : 1080i ADJUST: SELECT: EXIT: MENU 2 Press 5/∞ to move the cursor (3) to "REMOTE SWITCH." • The Setup Menu consists of two pages. If you keep pressing 5/∞, you can move to the other page from the current page. 3 Press 2/3 to select the desired setting. Each time you press the button, the Remote Switch Mode changes as follows: MODE1: Input alternates between "VIDEO A" and "VIDEO B" when controlled from the external control unit. MODE2: Input alternates between "VIDEO A" and "RGB B/COMPO." when controlled from the external control unit. MODE3: Input alternates between "VIDEO A" and "RGB A" when controlled from the external control unit. MODE4: Input alternates between "VIDEO B" and "RGB B/COMPO." when controlled from the external control unit. MODE5: Input alternates between "VIDEO B" and "RGB A" when controlled from the external control unit. MODE6: Input alternates between "RGB B/COMPO." and "RGB A" when controlled from the external control unit. 4 Press MENU/EXIT (or MENU on the Monitor) once to exit from the menu operations. Setting the High-Definition Signal Types You can select one of the High-Definition (HD) signal types through the COMPONENT/RGB B terminals - 1080i or 1035i. Normally set it to "1080i." • Without setting "RGB/COMPO." correctly, you cannot show any picture though you select the COMPONENT input (see page 22). 1 On the remote control: Press MENU/EXIT while holding VOLUME - to display the Setup Menu. On the Monitor: Press MENU while holding 2 to display the Setup Menu. Cursor (3) SET-UP MENU STATUS DISPLAY CONTROL LOCK REMOTE SWITCH HD SIGNAL MODE WHITE BALANCE TIMER 1/2 : OFF : OFF : MODE1 : 1080i ADJUST: SELECT: EXIT: MENU 2 Press 5/∞ to move the cursor (3) to "HD SIGNAL MODE." • The Setup Menu consists of two pages. If you keep pressing 5/∞, you can move to the other page from the current page. 3 Press 2/3 to select the desired setting. Each time you press the button, the HD signal type alternates between "1080i" and "1035i." • You can select either "1080i" and "1035i" according to the HD signal you input - whichever gives you proportionally shaped pictures. 4 Press MENU/EXIT (or MENU on the Monitor) once to exit from the menu operations. 27
-
 1
1 -
2
-
3
-
4
-
5
-
6
-
7
-
8
-
9
-
10
-
11
-
12
-
13
-
14
-
15
-
16
-
17
-
18
-
19
-
20
-
21
-
22
-
23
-
 24
24 -
 25
25 -
 26
26 -
 27
27 -
 28
28 -
 29
29 -
 30
30 -
 31
31 -
 32
32 -
 33
33 -
 34
34 -
35
-
36
-
37
-
38
-
39
-
40
-
41
-
42
-
43
-
44
 |
 |
