JVC GR-D350 Instruction Manual - Page 27
Manual Focus, Exposure Control, FEATURES FOR RECORDING
 |
UPC - 046838023248
View all JVC GR-D350 manuals
Add to My Manuals
Save this manual to your list of manuals |
Page 27 highlights
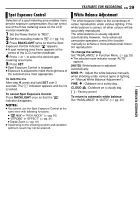
FEATURES FOR RECORDING EN 27 Manual Focus Exposure Control The camcorder's Full Range AF system offers continuous shooting ability from close-up (as close as approx. 5 cm to the subject) to infinity. However, correct focus may not be obtained depending on the shooting condition. In this case, use the manual focus mode. 1 Set the Power Switch to "REC". M 2 Set the recording mode to " ". (੬ pg. 14) 3 Press FOCUS. The manual focus indicator appears. 4 Press 2 or 1 to focus Manual focus indicator on a subject. ● When the focus level cannot be adjusted any further or closer, " " or " " will blink. 5 Press SET. Focus adjustment is complete. To reset to Auto Focus Press FOCUS twice. Manual focus is recommended in situations listed below. ● When two subjects overlap in the same scene. ● When illumination is low.* ● When the subject has no contrast (difference in brightness and darkness), such as a flat, onecolour wall, or a clear, blue sky.* ● When a dark object is barely visible in the LCD monitor or the viewfinder.* ● When the scene contains minute patterns or identical patterns that are regularly repeated. ● When the scene is affected by sunbeams or light reflecting off the surface of a body of water. ● When shooting a scene with a high-contrast background. * The following low-contrast warnings appear blinking: , , and . Manual exposure control is recommended in the following situations: ● When shooting using reverse lighting or when the background is too bright. ● When shooting on a reflective natural background such as at the beach or when skiing. ● When the background is overly dark or the subject is bright. M 1 Set the Power Switch to "REC". 2 Set the recording mode to " ". (੬ pg. 14) 3 Set "EXPOSURE" to "MANUAL" in FUNCTION Menu. (੬ pg. 23) ● The exposure control Menu appears. 4 To brighten the image, press 3. To darken the image, press 4. (maximum ±6) ● +3 exposure has the same effect as the backlight compensation. (੬ pg. 28) ● -3 exposure has the same effect as when "PROGRAM AE" is set to "SPOTLIGHT". (੬ pg. 31) 5 Press SET. Exposure adjustment is complete. To return to automatic exposure control Select "AUTO" in step 3. NOTES: ● You cannot use the manual exposure control at the same time when "PROGRAM AE" is set to "SPOTLIGHT" or "SNOW" (੬ pg. 31), or with the backlight compensation. ● If the adjustment does not cause any visible change in brightness, set "GAIN UP" to "AUTO". (☞ pg. 22, 23) ADVANCED FEATURES
-
 1
1 -
2
-
3
-
4
-
5
-
6
-
7
-
8
-
9
-
10
-
11
-
12
-
13
-
14
-
15
-
16
-
17
-
18
-
19
-
20
-
21
-
 22
22 -
 23
23 -
 24
24 -
 25
25 -
 26
26 -
 27
27 -
 28
28 -
 29
29 -
 30
30 -
 31
31 -
 32
32 -
33
-
34
-
35
-
36
-
37
-
38
-
39
-
40
-
41
-
42
-
43
-
44
 |
 |
