JVC GS-TD1BUS Basic User Guide - Page 16
Recording 3D images video/still image, Parallax adjustment video/still image, on the touch screen. - everio
 |
View all JVC GS-TD1BUS manuals
Add to My Manuals
Save this manual to your list of manuals |
Page 16 highlights
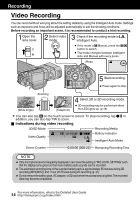
NOTE 0 When 3D recording is performed, still images will be saved in both 3D and 2D formats. 0 3D still images are saved as MP files (*.mpo). 0 3D still images cannot be printed. To print, make use of the 2D still image that is captured at the same time. 0 Use the provided software (Everio MediaBrowser 3D) to transfer 3D still images to a computer for playback. (p. 27) o Recording 3D images (video/still image) Switch to the 3D mode by pressing the 3D button such that "3D" is displayed on the screen. . 0 The mode changes between 3D and 2D with every press of the 3D button. 0 Images recorded in 2D mode cannot be displayed as 3D images. 0 To play back 3D images, refer also to "Precautions on Recording and Playing Back 3D Images". (p. 4, 5) o Parallax adjustment (video/still image) When recording 3D images, parallax is automatically adjusted. If the left and right images of an object close to the camera do not appear to be in alignment, or the 3D effect of a distant object is weak, you can change the way they appear to the eye by adjusting the parallax. A Tap k on the touch screen. C Tap "+" or "-" to adjust the parallax. . B Tap "MANUAL". SET . D Tap "SET". AUTO MANUAL . NOTE 0 When "PARALLAX ADJUSTMENT" is assigned to the ADJ button, parallax can be adjusted manually using the ADJ button and control dial. For details, refer to the "Detailed User Guide". 16 For more information, refer to the Detailed User Guide http://manual.jvc.co.jp/index.html/
-
 1
1 -
2
-
3
-
4
-
5
-
6
-
7
-
8
-
9
-
10
-
 11
11 -
 12
12 -
 13
13 -
 14
14 -
 15
15 -
 16
16 -
 17
17 -
 18
18 -
 19
19 -
 20
20 -
 21
21 -
22
-
23
-
24
-
25
-
26
-
27
-
28
-
29
-
30
-
31
-
32
-
33
-
34
-
35
-
36
-
37
-
38
-
39
-
40
-
41
-
42
-
43
-
44
-
45
-
46
-
47
-
48
-
49
-
50
-
51
-
52
-
53
-
54
-
55
-
56
-
57
-
58
-
59
-
60
-
61
-
62
-
63
-
64
-
65
-
66
-
67
-
68
-
69
-
70
-
71
-
72
-
73
-
74
-
75
-
76
-
77
-
78
-
79
-
80
-
81
-
82
-
83
-
84
-
85
-
86
-
87
-
88
-
89
-
90
-
91
-
92
-
93
-
94
-
95
-
96
-
97
-
98
-
99
-
100
-
101
-
102
-
103
-
104
-
105
-
106
-
107
-
108
 |
 |
