JVC GS-TD1BUS Basic User Guide - Page 4
Precautions on Recording and Playing Back 3D Images
 |
View all JVC GS-TD1BUS manuals
Add to My Manuals
Save this manual to your list of manuals |
Page 4 highlights
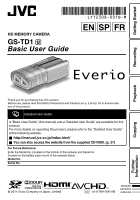
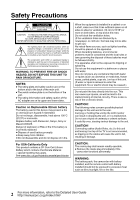
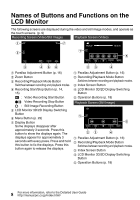
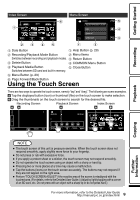
Precautions on Recording and Playing Back 3D Images 3D images can be recorded and played back on this unit. You can enjoy realistic and powerful 3D images recorded on this unit by playing back on a 3D compatible TV. Before use, please read the following precautions to ensure safe and comfortable viewing of the 3D images. Recording 3D Images This unit makes use of the misalignment between the images that enter the left and right eyes to create the 3D effect during 3D recording. As the images that enter the left and right eyes are different, fatigue may be experienced. In addition, depending on the content of the video, an illusion of movement may be experienced and result in motion sickness. Take note of the following when recording 3D images. o Basic Way to Hold a Camcorder o Shooting Distance During 3D During 3D Recording Recording (Recording Stable Images) (Achieving Comfortable 3D Images) Hold the LCD monitor while recording It is recommended to perform 3D recording within the optimal zone. 50 m (164') Optimal Keep elbows close to your sides to avoid camera shake 5 m (16'4") TelepZhootnoe Optimal 10 m (32'8") ZAonnglee Wide Open your legs slightly 1 m (3'3") . . 0 Make sure that you have stable footing during recording. 0 Do not swing the camera horizontally or vertically during recording. 0 If the subject is not recorded within the recommended shooting distance, 3D effect may be weak. 0 When recording night scenes or landscapes, 3D effect of some subjects may be weak. 0 For subjects that appear at the side of the screen, 3D effect may be weak. 0 Operate slowly when using the zoom. 0 If the image is zoomed in too much, 3D effect may be weak. 0 It is recommended to make use of a tripod. LCD Monitor The LCD monitor supports 3D images during both recording and playback. Press the "3D/2D" button on the touch screen to change the display on the LCD monitor between 3D and 2D. 0 When using the 3D recording mode, the image will be recorded in 3D even if the display on the LCD monitor is set to 2D. 0 3D effect appears stronger when viewed at approximately 30 cm (11-3/4") from the front. 0 3D effect may be weak if viewed from an angle other than the front. 0 The LCD monitor appears darker when 3D images are displayed. Change the display to 2D when it is difficult to see, such as when using this unit outdoors. 4 For more information, refer to the Detailed User Guide http://manual.jvc.co.jp/index.html/
-
 1
1 -
 2
2 -
 3
3 -
 4
4 -
 5
5 -
 6
6 -
 7
7 -
 8
8 -
 9
9 -
 10
10 -
11
-
12
-
13
-
14
-
15
-
16
-
17
-
18
-
19
-
20
-
21
-
22
-
23
-
24
-
25
-
26
-
27
-
28
-
29
-
30
-
31
-
32
-
33
-
34
-
35
-
36
-
37
-
38
-
39
-
40
-
41
-
42
-
43
-
44
-
45
-
46
-
47
-
48
-
49
-
50
-
51
-
52
-
53
-
54
-
55
-
56
-
57
-
58
-
59
-
60
-
61
-
62
-
63
-
64
-
65
-
66
-
67
-
68
-
69
-
70
-
71
-
72
-
73
-
74
-
75
-
76
-
77
-
78
-
79
-
80
-
81
-
82
-
83
-
84
-
85
-
86
-
87
-
88
-
89
-
90
-
91
-
92
-
93
-
94
-
95
-
96
-
97
-
98
-
99
-
100
-
101
-
102
-
103
-
104
-
105
-
106
-
107
-
108
 |
 |