JVC GY-DV500U GY-DV500 User Manual - PDF (4,089KB) - Page 34
Inserting and Replacing Backup Lithium Batteries
 |
View all JVC GY-DV500U manuals
Add to My Manuals
Save this manual to your list of manuals |
Page 34 highlights
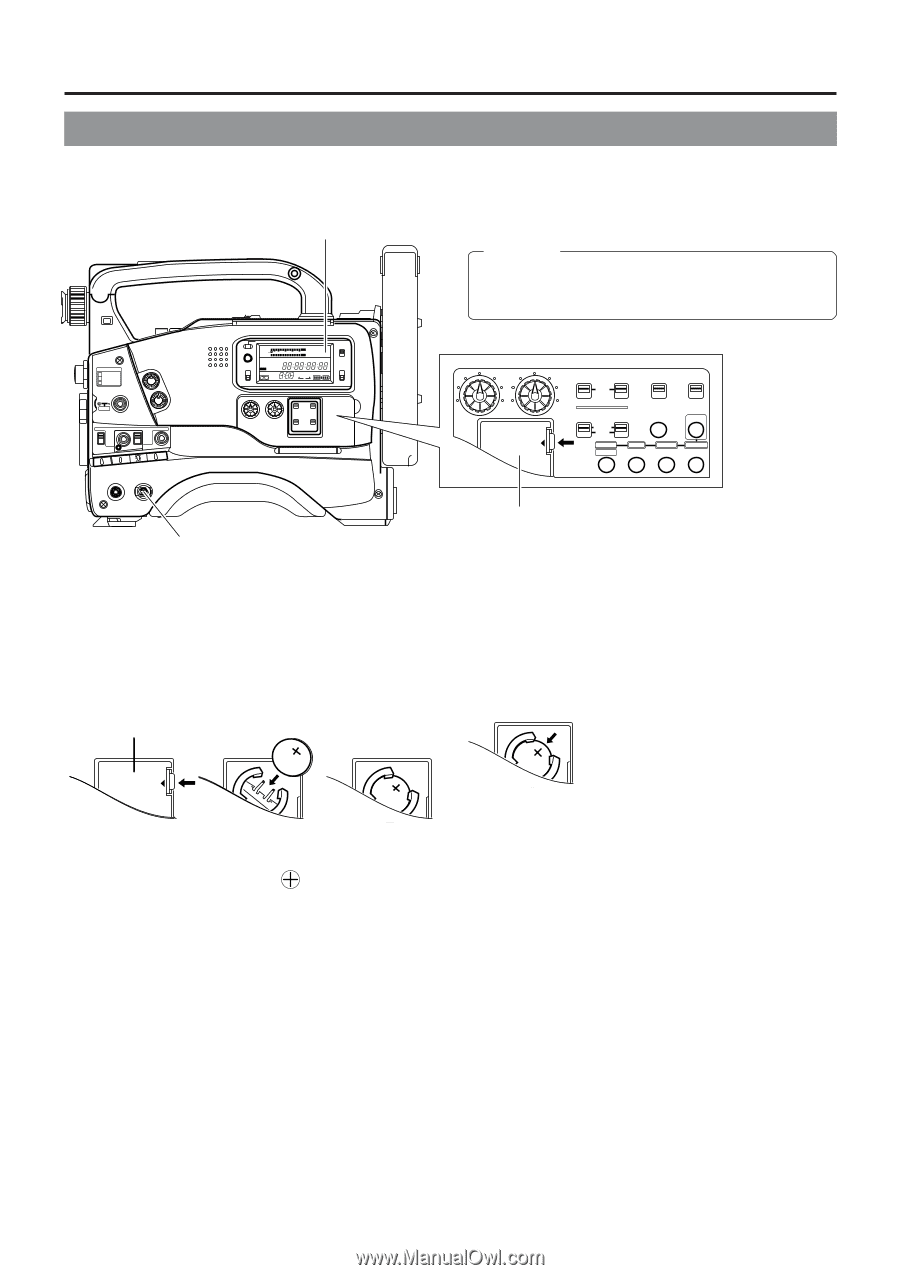
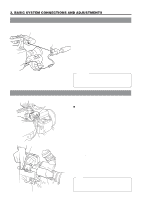
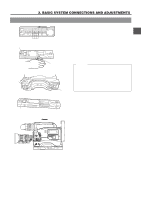
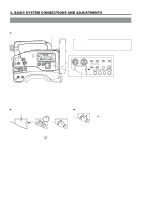
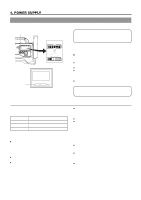
3. BASIC SYSTEM CONNECTIONS AND ADJUSTMENTS 3-7 Inserting and Replacing Backup Lithium Batteries The GY-DV500 uses a lithium battery for backup of the time code data and time date data. Install the provided lithium battery before actually using the unit. ● Lithium battery: CR2032 "Li" indicator CAUTION: If the unit is not used for a lengthy period of time (one month or more), remove the lithium battery. If the voltage of the lithium battery becomes low, the set may malfunction. FILTER 1 3200k 2 5600k 3 5600k+ND SHUTTER STATUS MENU ALARM MONITOR AUTO IRIS FULL AUTO BLACK BACK L NORMAL SPOT L STRETCH NORMAL COMPRESS LOLUX PRST A B ON KNEE OFF AUTO BARS CAM HML SAVE STBY VTR GAIN OUTPUT WHT.BAL NG POWER ON OFF OPERATE/WARNING RESET MONITOR SELECT CH 1 CH 2 40 30 20 32k 48k AUD LOCK SP MENU REMAIN H OVER AUTO OFF DEW 10 0 dB OVER SERVO RF L i PB NDF HOLD H M S F REV FWD E BATT F M LIGHT ON OFF COUNTER CTL TC UB CH-1 AUDIO CH-2 LEVEL Power switch CH-1 AUDIO LEVEL CH-2 LITHIUM BATT. CH-1 CH-2 TC GENERATOR AUTO MANUAL PRESET REGEN AUDIO SELECT FREE REC AUDIO INPUT CH-1 CH-2 CONTINUE MENU FRONT REAR GROUP HOLD ITEM SELECT DATA SET SHIFT ADVANCE PRESET Lithium battery case When the lithium battery is not in place or the battery is exhausted and requires a replacement, the "Li" indicator in the LCD display will light up. Replace lithium batteries with the POWER switch set to ON. Doing it with the POWER switch set to OFF will cause the loss of backup data. Ⅲ How to Install the Lithium Battery Lithium battery cover CR2032 LITHIUM BATT. CR2032 1. Push the lithium battery cover in the direction of the arrow as illustrated and remove the cover. 2. Slide the battery into place with its upward. marked surface facing 3. Return the lithium battery cover to its original position in the unit. Ⅲ How to Remove Lithium Batteries Ⅲ The lithium battery is easily removed CR2032 if you press at the edge of the lithium battery at the place indicated in the illustration on the left and then pull the battery out. 34
-
 1
1 -
2
-
3
-
4
-
5
-
6
-
7
-
8
-
9
-
10
-
11
-
12
-
13
-
14
-
15
-
16
-
17
-
18
-
19
-
20
-
21
-
22
-
23
-
24
-
25
-
26
-
27
-
28
-
 29
29 -
 30
30 -
 31
31 -
 32
32 -
 33
33 -
 34
34 -
 35
35 -
 36
36 -
 37
37 -
 38
38 -
 39
39 -
40
-
41
-
42
-
43
-
44
-
45
-
46
-
47
-
48
-
49
-
50
-
51
-
52
-
53
-
54
-
55
-
56
-
57
-
58
-
59
-
60
-
61
-
62
-
63
-
64
-
65
-
66
-
67
-
68
-
69
-
70
-
71
-
72
-
73
-
74
-
75
-
76
-
77
-
78
-
79
-
80
-
81
-
82
-
83
-
84
-
85
-
86
-
87
-
88
-
89
-
90
-
91
-
92
-
93
-
94
-
95
-
96
 |
 |