JVC GY-HM700UXT JVC ProHD Clip Manager Owner's Manual (47 pg.) - Page 5
For Windows, Operating Environment, Installing the Application, Launching and Exiting the Application
 |
View all JVC GY-HM700UXT manuals
Add to My Manuals
Save this manual to your list of manuals |
Page 5 highlights
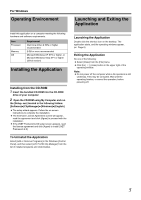
For Windows Operating Environment Launching and Exiting the Application Install this application on a computer meeting the following hardware and software requirements. Item Processor Memory OS Requirement Intel Core 2 Duo 2 GHz or higher recommended 2 GB or more recommended Microsoft Windows XP SP3 or higher, or Microsoft Windows Vista SP1 or higher (32-bit version) Installing the Application Installing from the CD-ROM 1 Insert the bundled CD-ROM into the CD-ROM drive of your computer 2 Open the CD-ROM using My Computer and run the [Setup. exe] located in the following folders: [Software]B[ClipManager]B[Windows]B[English] ● The setup wizard appears. Follow the on-screen instructions to complete the installation. ● The End-User License Agreement screen will appear, read the agreement and click [Agree] to proceed with the installation. ● If the [.NET Framework 2.0] setup screen appears, read the license agreement and click [Agree] to install [.NET Framework 2.0]. To Uninstall the Application Select [Add or Remove Programs] in the Windows [Control Panel], and then select [JVC ProHD Clip Manager] from the list of installed programs and click [Delete]. Launching the Application Double click the shortcut icon on the desktop. The application starts, and the operating windows appear. (A Page 6) Exiting the Application Do one of the following: ● Select [Close] from the [File] menu. ● Click the [ × ] (close) button in the upper right of the operating window. Note: ● Do not power off the computer while a file operation is still underway. Files may be corrupted. Wait until the operating finishes, or cancel the operation, before powering off. 5
-
 1
1 -
 2
2 -
 3
3 -
 4
4 -
 5
5 -
 6
6 -
 7
7 -
 8
8 -
 9
9 -
 10
10 -
 11
11 -
12
-
13
-
14
-
15
-
16
-
17
-
18
-
19
-
20
-
21
-
22
-
23
-
24
-
25
-
26
-
27
-
28
-
29
-
30
-
31
-
32
-
33
-
34
-
35
-
36
-
37
-
38
-
39
-
40
-
41
-
42
-
43
-
44
-
45
-
46
-
47
 |
 |
