JVC GZ-E10 User Manual - English - Page 47
Installing the Provided Software Built-in, Preparations, Installation Procedure, Windows Vista/ - user guide
 |
View all JVC GZ-E10 manuals
Add to My Manuals
Save this manual to your list of manuals |
Page 47 highlights
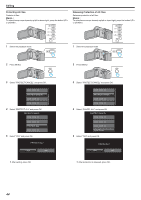
Copying Installing the Provided Software (Built-in) You can display the recorded images in calendar format and perform simple editing using the provided software. Preparations Connect this unit to a computer with a USB cable. 1 Open the LCD monitor. Installation Procedure o Windows Vista/Windows 7 0 Refer to the operating instructions found in the animation on the Detailed User Guide. o Windows XP 0 Refer to the operating instructions found in the animation on the Detailed User Guide. . 2 Connect the USB cable and the AC adapter. AC Adapter To AC Outlet (110 V to 240 V) To DC Connector To USB Connector USB Cable (Provided) To USB Connector Computer . A Connect using the provided USB cable. B Connect the AC adapter to this unit. 0 This unit powers on automatically when the AC adapter is connected. 0 Be sure to use the supplied AC adapter. C The "SELECT DEVICE" menu appears. 3 Select "CONNECT TO PC" and press OK. SELECT DEVICE SELECT DEVICE TYPE TO CONNECT CONNECT TO PC . 4 Select "PLAYBACK ON PC" and press OK. CONNECT TO PC PLAYBACK ON PC . 0 "Everio Software Setup" appears on the computer. The subsequent operations are to be performed on the computer. Memo : 0 If "Everio Software Setup" doesn't appear, double-click "JVCCAM_APP" in "My Computer", then double-click "install.exe". 0 If the auto play dialog box appears, select "Open folder to view files" and click "OK". Then, click "install.exe" in the folder. 47
-
 1
1 -
2
-
3
-
4
-
5
-
6
-
7
-
8
-
9
-
10
-
11
-
12
-
13
-
14
-
15
-
16
-
17
-
18
-
19
-
20
-
21
-
22
-
23
-
24
-
25
-
26
-
27
-
28
-
29
-
30
-
31
-
32
-
33
-
34
-
35
-
36
-
37
-
38
-
39
-
40
-
41
-
 42
42 -
 43
43 -
 44
44 -
 45
45 -
 46
46 -
 47
47 -
 48
48 -
 49
49 -
 50
50 -
 51
51 -
 52
52 -
53
-
54
-
55
-
56
-
57
-
58
-
59
-
60
-
61
-
62
-
63
-
64
-
65
-
66
-
67
-
68
-
69
-
70
-
71
-
72
-
73
-
74
-
75
-
76
-
77
-
78
-
79
-
80
-
81
-
82
-
83
-
84
-
85
 |
 |
