JVC GZ-E505B User Guide - Page 10
Playing Back on TV
 |
View all JVC GZ-E505B manuals
Add to My Manuals
Save this manual to your list of manuals |
Page 10 highlights
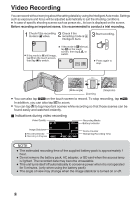
Playing Back on TV Preparation: 0 Turn off both camera and TV. To connect using the HDMI mini connector When connecting to a 1080p compatible TV, set [HDMI OUTPUT] in [CONNECTION SETTINGS] to [AUTO]. To HDMI Mini Connector HDMI Cable (Optional) NOTE 0 Use a High Speed HDMI mini cable. TV HDMI Connector Input .. To connect using the AV connector Change the settings of [VIDEO OUTPUT] in [CONNECTION SETTINGS] according to the connection. TV AV Cable (Provided) To AV Connector Yellow White Red Video Input Video Input Audio Input (L) Audio Input (R) Playback Operation After the connection with TV is completed A Turn on the camera and the TV. 0 This unit powers on automatically when the AC adapter is connected. B Select the TV input switch. C Start playback on the camera. 10
-
 1
1 -
2
-
3
-
4
-
 5
5 -
 6
6 -
 7
7 -
 8
8 -
 9
9 -
 10
10 -
 11
11 -
 12
12 -
 13
13 -
 14
14 -
 15
15 -
16
-
17
-
18
-
19
-
20
-
21
-
22
-
23
-
24
-
25
-
26
-
27
-
28
-
29
-
30
-
31
-
32
-
33
-
34
-
35
-
36
-
37
-
38
-
39
-
40
-
41
-
42
-
43
-
44
-
45
-
46
-
47
-
48
-
49
-
50
-
51
-
52
-
53
-
54
-
55
-
56
-
57
-
58
-
59
-
60
 |
 |
