JVC GZ-E505B User Guide - Page 8
Recording
 |
View all JVC GZ-E505B manuals
Add to My Manuals
Save this manual to your list of manuals |
Page 8 highlights
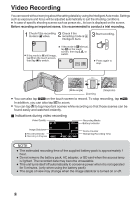
Video Recording You can record without worrying about the setting details by using the Intelligent Auto mode. Settings such as exposure and focus will be adjusted automatically to suit the shooting conditions. 0 In case of specific shooting scenes such as person etc., its icon is displayed on the screen. Before recording an important scene, it is recommended to conduct a trial recording. 2 Check if the recording mode is A video. Check if the recording mode is C Intelligent Auto. A If the mode is B still image, tap B on the touch screen, then tap A to switch. If the mode is H Manual, tap H on the touch screen, then tap P to switch. A C PH Start recording. Press again to stop. .. (Wide angle) (Telephoto) Zooming 0 You can also tap 6 on the touch screen to record. To stop recording, tap 7. In addition, you can also tap D to zoom. 0 You can tap D to tag important scenes while recording so that those scenes can be found easily and watched instantly. o Indications during video recording Video Quality Recording Media Battery Indicator Image Stabilizer Recording-Standby Recording in Progress ˻PLAY REC 0:00:00 [0:54] MENU Scene Counter Remaining Recording Time NOTE 0 The estimated recording time of the supplied battery pack is approximately 1 hour. 0 Do not remove the battery pack, AC adapter, or SD card when the access lamp is lighted. The recorded data may become unreadable. 0 This unit turns itself off automatically to conserve power when it is not operated for 5 minutes. (only when using the battery pack) 0 The angle of view may change when the image stabilizer is turned on or off. 8
-
 1
1 -
2
-
 3
3 -
 4
4 -
 5
5 -
 6
6 -
 7
7 -
 8
8 -
 9
9 -
 10
10 -
 11
11 -
 12
12 -
 13
13 -
14
-
15
-
16
-
17
-
18
-
19
-
20
-
21
-
22
-
23
-
24
-
25
-
26
-
27
-
28
-
29
-
30
-
31
-
32
-
33
-
34
-
35
-
36
-
37
-
38
-
39
-
40
-
41
-
42
-
43
-
44
-
45
-
46
-
47
-
48
-
49
-
50
-
51
-
52
-
53
-
54
-
55
-
56
-
57
-
58
-
59
-
60
 |
 |