JVC GZ-HM200BUS Instructions - Page 15
Remote Control, Camcorder
 |
UPC - 046838037788
View all JVC GZ-HM200BUS manuals
Add to My Manuals
Save this manual to your list of manuals |
Page 15 highlights
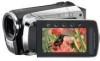
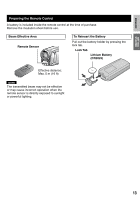
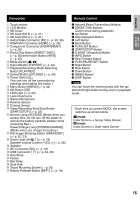
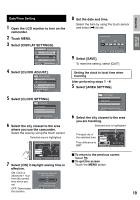
ENGLISH GETTING STARTED Camcorder ! Touch sensor # LCD Monitor $ SD Cover % SD Card Slot B (Z p. 21) & SD Card Slot A (Z p. 21) ( Audio/Video Connector [AV] (Z p. 30, 36) ) HDMI Mini Connector [HDMI] (Z p. 30) * Component Connector [COMPONENT] (Z p. 30) + Direct Disc Button [DIRECT DISC] (Z p. 35)/Information Button [INFO] (Z p. 25) , Mode Switch [!, #] - Export Button [EXPORT] (Z p. 42) . Playback/Recording Mode Switching Button [PLAY/REC] / Upload Button [UPLOAD] (Z p. 43) 0 Power Switch [ ] (You can turn off the camcorder by pressing and holding this button.) 1 Menu Button [MENU] (Z p. 44) 2 OK Button [OK] 3 LED Light (Z p. 24) 4 Lens Cover/Lens 5 Stereo Microphone 6 Remote Sensor 7 Camera Sensor 8 Video Recording Start/Stop Button [START/STOP] (Z p. 22) 9 Access Lamp [ACCESS] (Blinks when you access files. Do not turn off the power or remove the battery pack/AC adapter while accessing files.) Power/Charge Lamp [POWER/CHARGE] (Blinks when you charge the battery.) : Still Image Shooting Button [SNAPSHOT] (Z p. 22, 23) ; Zoom Lever [W 7 , T] (Z p. 24) Speaker Volume Control [-VOL+] (Z p. 28) < Speaker = DC Connector [DC] (Z p. 18) > USB Connector [ 2 ] (Z p. 34, 38) ? Grip Strap @ Fasten A Belt Strap B Stud Hole C Tripod Mounting Socket (Z p. 20) D Battery Release Button [BATT.] (Z p. 18) Remote Control Q Infrared Beam Transmitting Window R ZOOM (T/W) Buttons (Zoom in/out during playback.) S Up Button T Skip Backward Button U Left Button V Back Button W PLAYLIST Button X START/STOP Button Y S.SHOT (Snapshot) Button Z INFO Button a Skip Forward Button b PLAY/PAUSE/SET Button c Right Button d Next Button e Down Button f INDEX Button* g DISP Button NOTE You can move the zooming area with the up/ down/left/right button during zoom in playback mode. * Each time you press INDEX, the screen switches as shown below: ! mode: Index Screen ↔ Group Index Screen # mode: Index Screen ↔ Date Index Screen 15
-
 1
1 -
2
-
3
-
4
-
5
-
6
-
7
-
8
-
9
-
 10
10 -
 11
11 -
 12
12 -
 13
13 -
 14
14 -
 15
15 -
 16
16 -
 17
17 -
 18
18 -
 19
19 -
 20
20 -
21
-
22
-
23
-
24
-
25
-
26
-
27
-
28
-
29
-
30
-
31
-
32
-
33
-
34
-
35
-
36
-
37
-
38
-
39
-
40
-
41
-
42
-
43
-
44
-
45
-
46
-
47
-
48
-
49
-
50
-
51
-
52
-
53
-
54
-
55
-
56
-
57
-
58
-
59
-
60
-
61
-
62
-
63
-
64
-
65
-
66
-
67
-
68
-
69
-
70
-
71
-
72
-
73
-
74
-
75
-
76
-
77
-
78
-
79
-
80
-
81
-
82
-
83
-
84
-
85
-
86
-
87
-
88
-
89
-
90
-
91
-
92
-
93
-
94
-
95
-
96
-
97
-
98
-
99
-
100
-
101
-
102
-
103
-
104
 |
 |
