JVC GZ-MS120BU Instructions - Page 16
Other Settings
 |
UPC - 046838037719
View all JVC GZ-MS120BU manuals
Add to My Manuals
Save this manual to your list of manuals |
Page 16 highlights
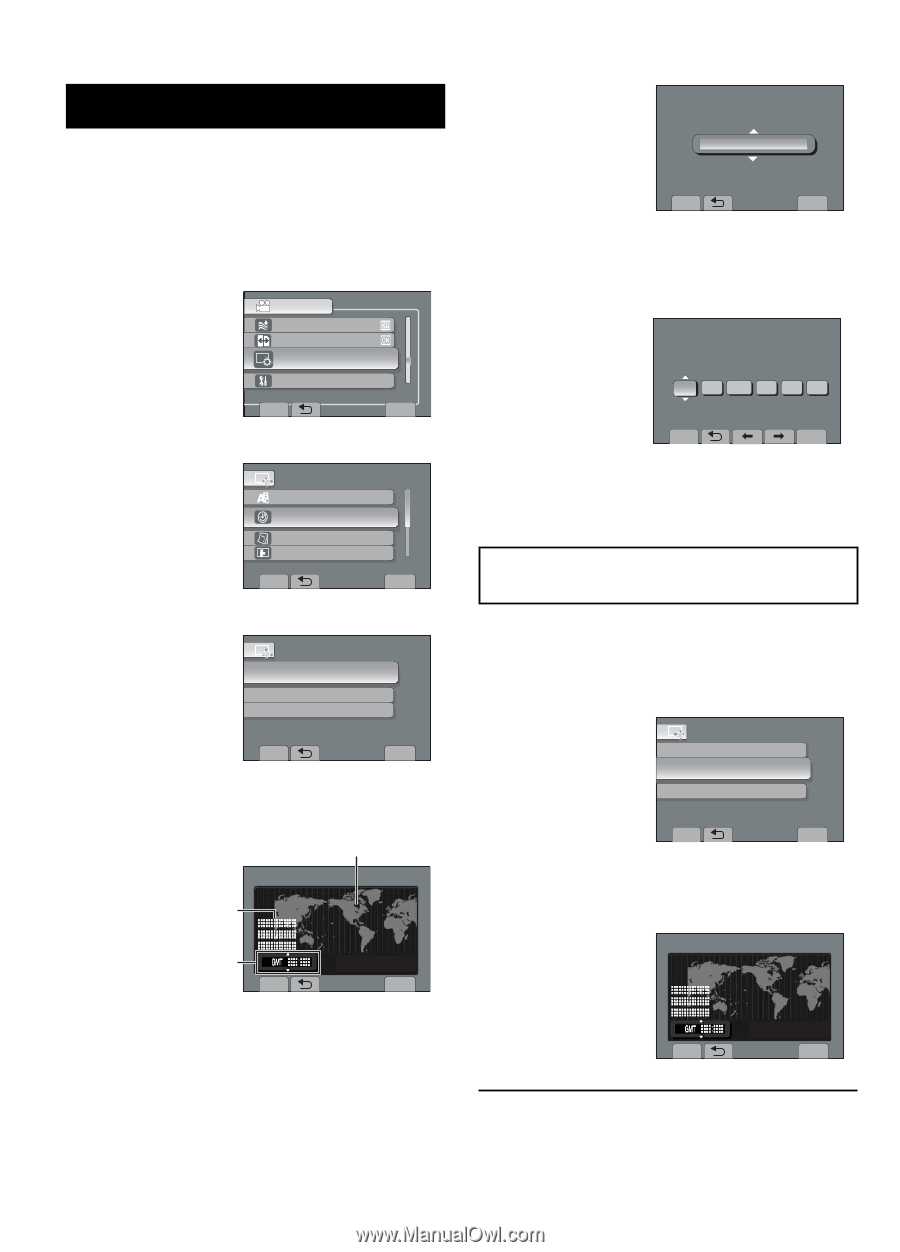
Other Settings Date/Time Setting 1 Open the LCD monitor to turn on the camcorder. 2 Touch MENU. 3 Select [DISPLAY SETTINGS]. VIDEO WIND CUT AUTO SWITCH REC MEDIA DISPLAY SETTINGS > BASIC SETTINGS CONFIGURE ON-SCREEN DISPLAY SET > QUIT 4 Select [CLOCK ADJUST]. DISPLAY SETTINGS LANGUAGE CLOCK ADJUST DATE DISPLAY STYLE MONITOR BRIGHT SET DATE AND TIME SET QUIT 5 Select [CLOCK SETTING]. CLOCK ADJUST CLOCK SETTING AREA SETTING SET FOR DAYLIGHT SAVING TIME SET THE CITY, DATE AND TIME SET QUIT 6 Select the city closest to the area where you use the camcorder. Selected area is highlighted Principal city of the selected area AREA SETTING Time difference to GMT SET NOV.1.2009 04:55PM QUIT 7 Select [ON] if daylight saving time is effective. [ON]: Clock is advanced one hour from the normal time which you set. [OFF]: Deactivates the function. EN16 SET FOR DAYLIGHT SAVING TIME DAYLIGHT SAVING TIME (DST) OFF NOV.1.2009 04.55PM SET DAYLIGHT SAVING TIME SET QUIT 8 Set the date and time. Select the item by using the touch sensor and select [^] to set. CLOCK SETTING DATE NOV 1 TIME 2009 4 55 PM GMT+ 9:00 SAVE QUIT 9 Select [SAVE]. To reset the setting, select [QUIT] Setting the clock to local time when traveling After performing steps 1-4 5 Select [AREA SETTING]. CLOCK ADJUST CLOCK SETTING AREA SETTING SET FOR DAYLIGHT SAVING TIME SET WHEN IN ANOTHER COUNTRY SET QUIT 6 Select the city closest to the area you are traveling. AREA SETTING NOV.1.2009 04:55PM SET QUIT - To return to the previous screen Select !. - To quit the screen Select [QUIT].
-
 1
1 -
2
-
3
-
4
-
5
-
6
-
7
-
8
-
9
-
10
-
 11
11 -
 12
12 -
 13
13 -
 14
14 -
 15
15 -
 16
16 -
 17
17 -
 18
18 -
 19
19 -
 20
20 -
 21
21 -
22
-
23
-
24
-
25
-
26
-
27
-
28
-
29
-
30
-
31
-
32
-
33
-
34
-
35
-
36
-
37
-
38
-
39
-
40
-
41
-
42
-
43
-
44
 |
 |